Categories
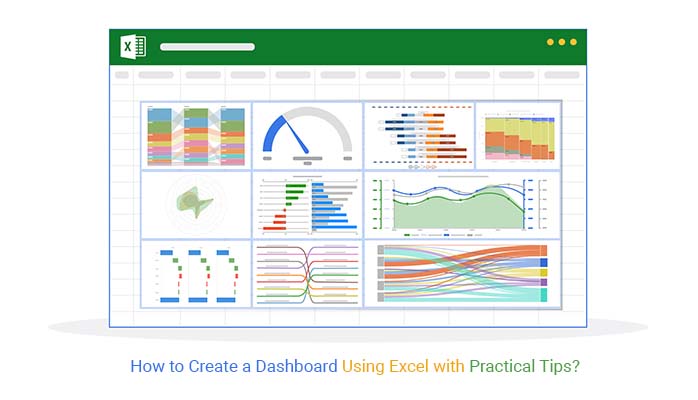
How do you create a dashboard using Excel?
If you’re dealing with messy spreadsheets and struggling to make sense of your data, you’re not alone. Excel dashboards have become essential for turning raw numbers into clear, actionable insights.
With over a billion users worldwide, Excel has evolved far beyond basic spreadsheets. It now supports data tracking, trend analysis, and data visualization—all in one place. A well-designed dashboard brings everything together, helping you monitor performance and make faster decisions.
According to Forbes, companies that use data analytics effectively are 5% more productive and 6% more profitable. Dashboards play a key role by simplifying complex data into easy-to-understand visuals.
So, how do you create a dashboard using Excel that actually delivers value? It may sound complex, but the process is more straightforward than you think.
Whether you want to track sales, monitor financial performance, or measure KPIs, Excel gives you the flexibility to build dashboards for any use case. In fact, 64% of companies rely on Excel for data management, making it a core tool in everyday business operations.
By the end of this guide, you’ll know exactly how to create a dashboard in Excel that transforms raw data into meaningful insights and supports smarter, data-driven decision-making.
First…
Definition: An Excel dashboard is a one-page visual report that combines charts, tables, and key metrics to help users quickly monitor performance and analyze data.
It simplifies complex datasets by presenting them in a clear, interactive format, making it easier to track trends, compare results, and support data-driven decision-making. Excel dashboards can be customized based on specific goals, such as tracking sales, financial performance, or key business KPIs.
By bringing all critical information into a single view, an Excel dashboard helps users save time, reduce manual analysis, and stay focused on what matters most.
Building dashboards in Excel helps turn raw data into clear, actionable insights, making it easier for teams to monitor performance and support data-driven decision-making. Instead of working through large spreadsheets, users can quickly understand key metrics in one place.
Before creating a dashboard in Excel, it’s important to plan carefully. A well-prepared approach ensures your dashboard is accurate, easy to use, and delivers meaningful insights.
Follow these steps to build a clear, interactive dashboard using Excel that delivers actionable insights.
Ever tried making sense of endless rows of numbers? It can feel like searching for a needle in a haystack.
Data visualization changes all that. It turns raw data into clear, understandable insights.
Excel is great for basic analysis, but when you need advanced dashboards, it can feel limiting. That’s where an Excel add-in like ChartExpo can help. It transforms your spreadsheets into interactive dashboards, making it simple to visualize complex data, including flows and relationships, with tools like a Sankey chart generator.
Now, let’s walk through how to create a dashboard in Excel and elevate it with powerful visualizations.
Here are some of the best Excel Dashboard Ideas:
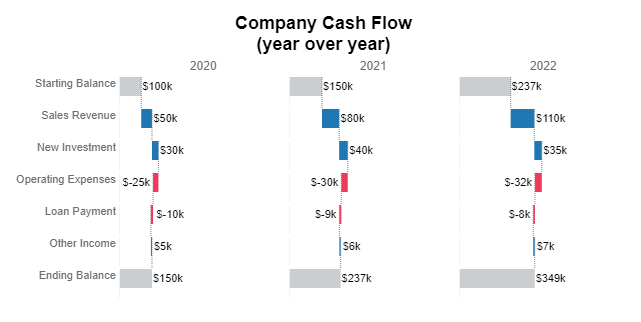
Shows sequential increases and decreases, making it easy to track profit/loss, revenue changes, or any cumulative data in your dashboard.
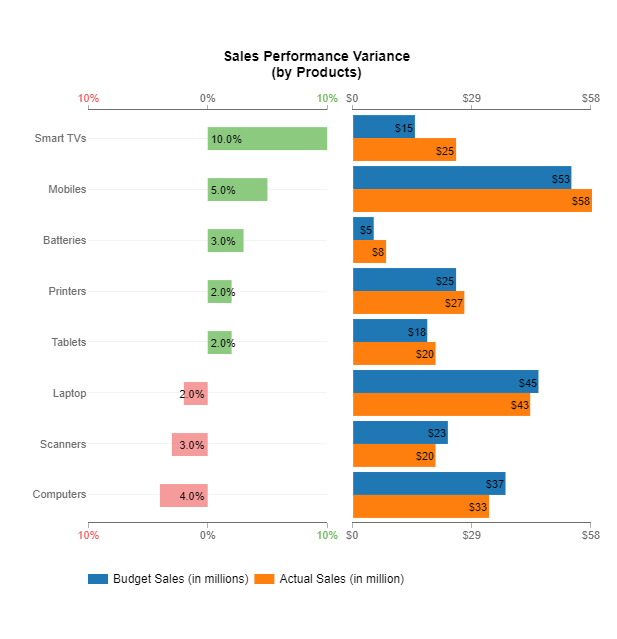
Compares multiple categories side by side, helping you quickly spot trends, gaps, or top-performing items.
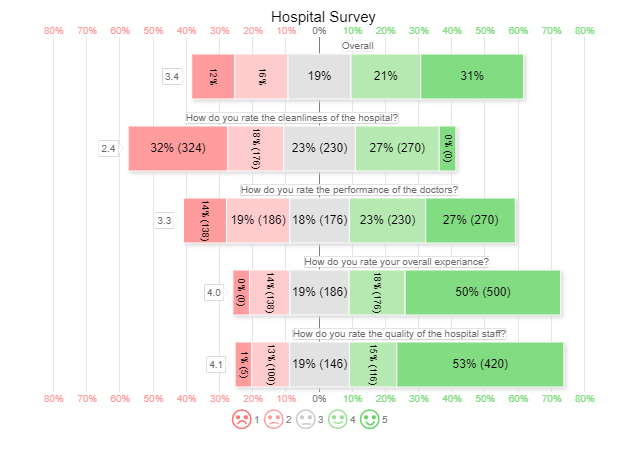
Visualizes survey responses or feedback scores on a scale, perfect for understanding customer or employee sentiment at a glance.
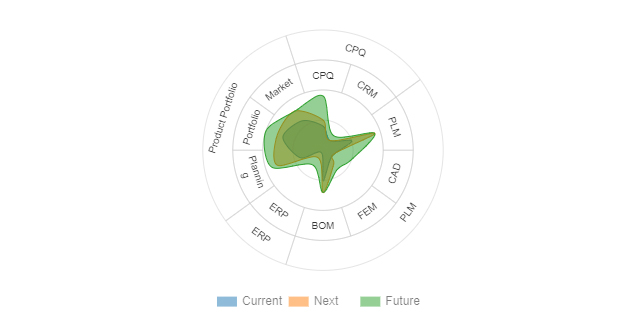
Displays hierarchical structures in a compact, circular format, making organizational relationships easy to understand in dashboards.
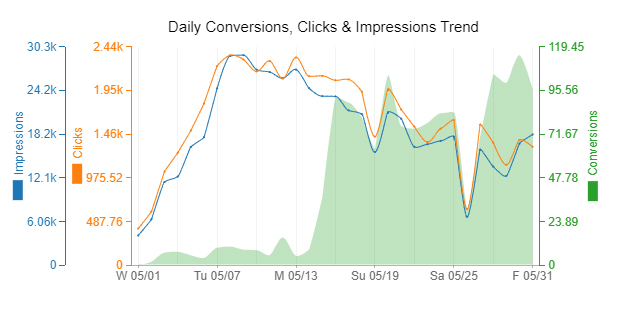
Plots multiple metrics with different scales on the same graph, ideal for tracking complex trends over time in one view.
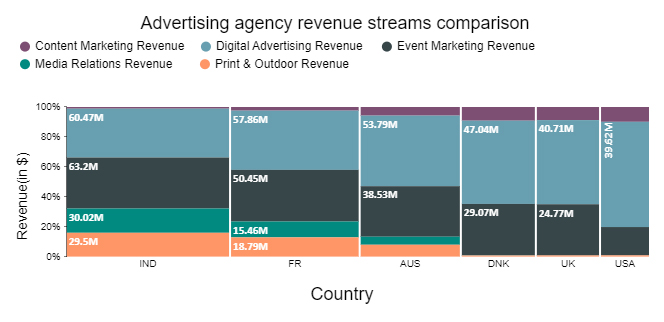
Highlights proportions and relationships across categories, excellent for market share, product segmentation, or demographic comparisons.
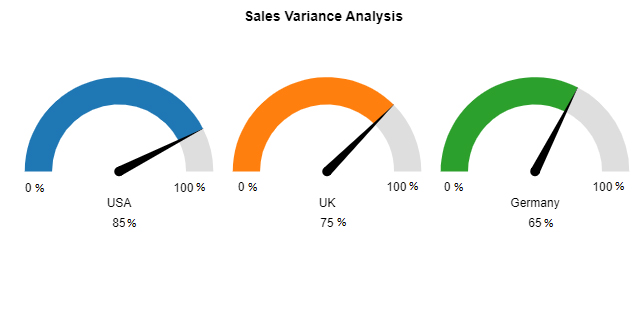
Shows multiple KPIs in one visual, giving stakeholders a quick snapshot of performance metrics simultaneously.
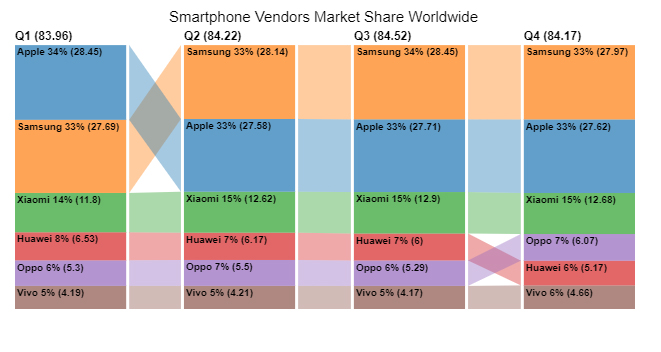
Illustrates changes between two points for various categories, helping identify trends, improvements, or declines effectively.

Tracks project milestones, goals, or performance metrics visually, making it easy to monitor progress at a glance.
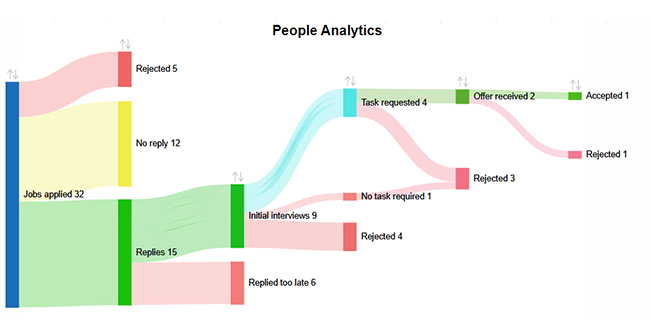
Maps flows and connections between data points, ideal for visualizing processes, resource allocation, or user journeys within a dashboard.
A sales dashboard tracks revenue, sales targets, and performance across regions or products. It provides a quick overview of which products are performing best, highlights trends over time, and helps identify areas that need attention.
A KPI dashboard monitors key business metrics, such as operational efficiency, revenue growth, or customer satisfaction. It allows teams to quickly see whether they are meeting goals and spot performance changes at a glance.
Marketing dashboards visualize campaign performance, lead generation, and conversion rates. They help marketing teams understand which strategies are working, track progress toward goals, and make data-driven decisions.
| Feature / Aspect | Excel | Power BI | Google Sheets |
| Ease of Use | Familiar interface for most users; easy for basic dashboards. | Steeper learning curve; designed for professional BI users. | Simple and collaborative; good for lightweight dashboards. |
| Data Volume | Handles moderate datasets well; can slow down with very large data. | Optimized for large datasets; handles millions of rows efficiently. | Suitable for small to medium datasets; may lag with very large files. |
| Visualization Options | Good variety; can be enhanced with add-ins for advanced charts. | Extensive built-in visualizations and custom visuals are available. | Limited visualizations; mainly standard charts, but easy to integrate with add-ons. |
| Real-Time Updates | Limited; manual refresh or external connections required. | Strong real-time data capabilities with automatic refresh. | Real-time updates are supported via Google Sheets collaboration and integrations. |
| Collaboration | Manual sharing or cloud via OneDrive; not inherently real-time. | Cloud-based collaboration; dashboards can be easily shared with teams. | Excellent real-time collaboration; multiple users can edit simultaneously. |
| Cost | Part of a Microsoft Office subscription; affordable for most businesses. | Paid subscription; higher cost for premium features and sharing. | Free for basic use; affordable for business accounts. |
| Integration | Strong with the Microsoft ecosystem; supports various add-ins for analytics. | Extensive integrations with databases, cloud services, and APIs. | Integrates with Google Workspace and third-party apps; less extensive than Power BI. |
| Best Use Case | Quick, moderately complex dashboards for reporting and analysis. | Enterprise-grade business intelligence and advanced analytics. | Simple dashboards, lightweight reporting, and collaborative projects. |
Excel dashboards are powerful, but they have some limitations to be aware of:
Designing an effective Excel dashboard requires clarity, focus, and usability. Follow these best practices to create dashboards that deliver insights quickly:
Yes, you can create a dashboard in Excel!
Excel offers powerful tools like PivotTables, charts, slicers, and Power Query to build interactive and dynamic dashboards. You can visualize key metrics, track trends, and make data-driven decisions—all within a single Excel sheet. Whether it’s for sales, a finance dashboard in Excel, or project tracking, Excel reporting dashboards are flexible and easy to customize.
Yes, we can create Dynamic dashboards in Excel by following these steps:
Microsoft Excel is a powerful tool for dashboard design. It helps visualize data through charts, graphs, and PivotTables. Excel allows real-time data updates, interactive filtering, and customization. This makes it ideal for tracking metrics and business performance efficiently.
You can create charts in an Excel dashboard, including bar, column, pie, line, area, scatter, and combo charts. You can also use PivotCharts, histograms, and waterfall charts for more advanced data visualization and analysis.
How to create a dashboard using Excel is straightforward, but success depends on careful planning and execution.
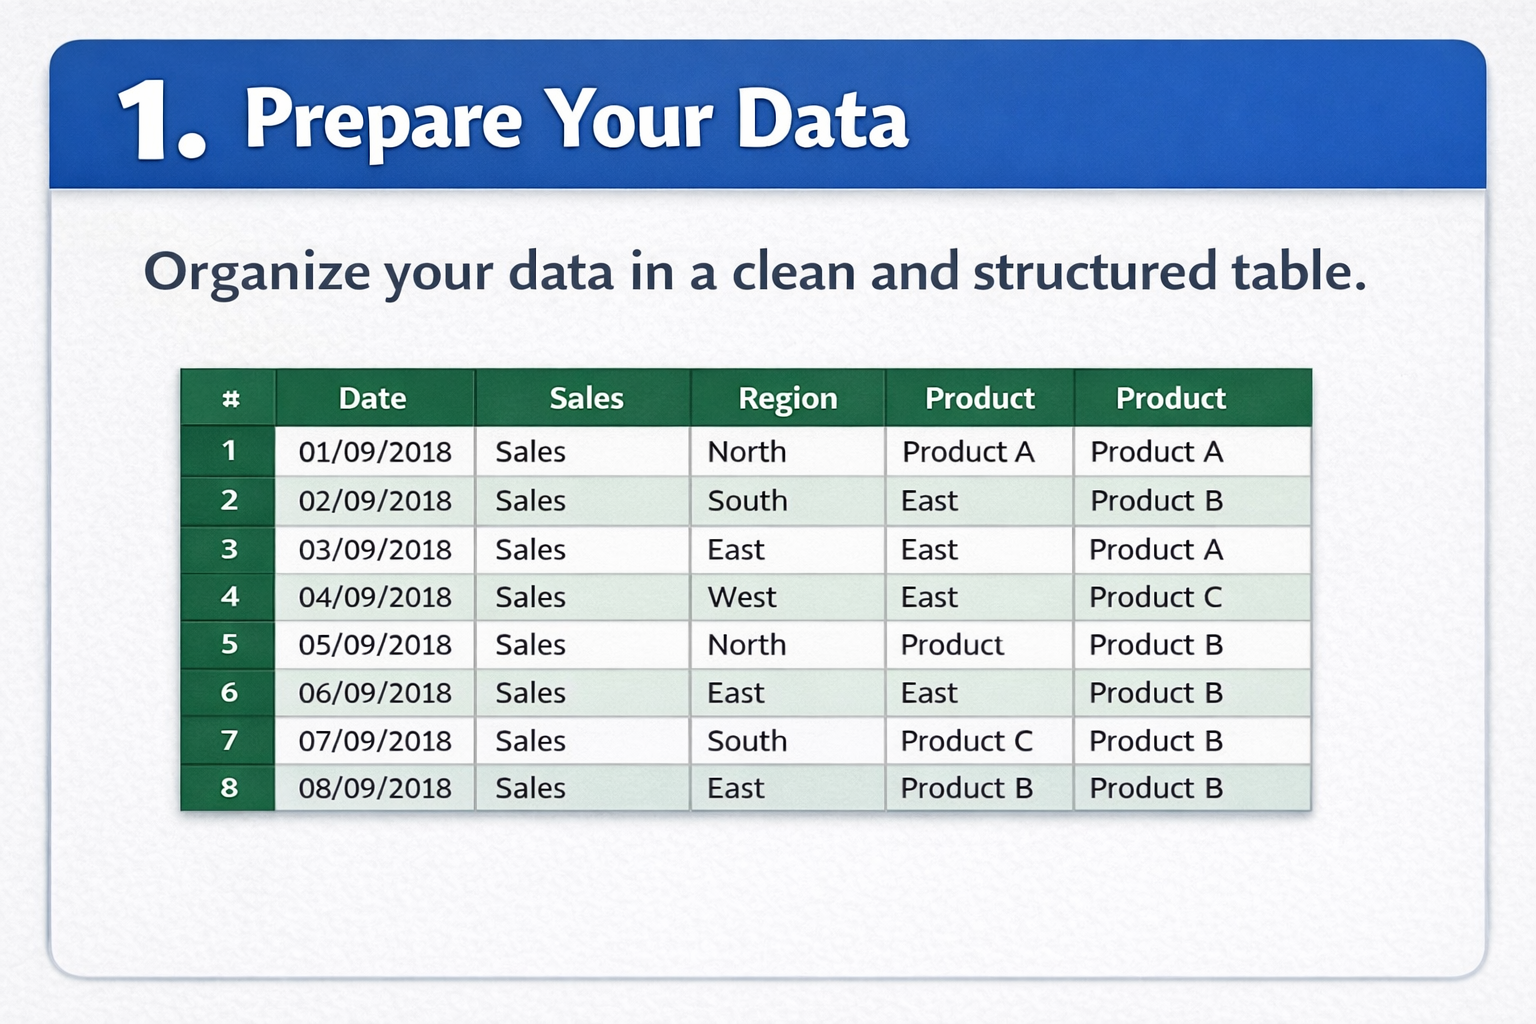
Start by defining your objectives. Identify the key metrics and KPIs your audience needs to see. Clear goals ensure your dashboard delivers actionable insights.
Next, gather and organize your data. Clean, structured data is essential for accurate calculations and meaningful visualizations. Use Excel’s built-in tools like sorting, filtering, and tables to prepare your data efficiently.
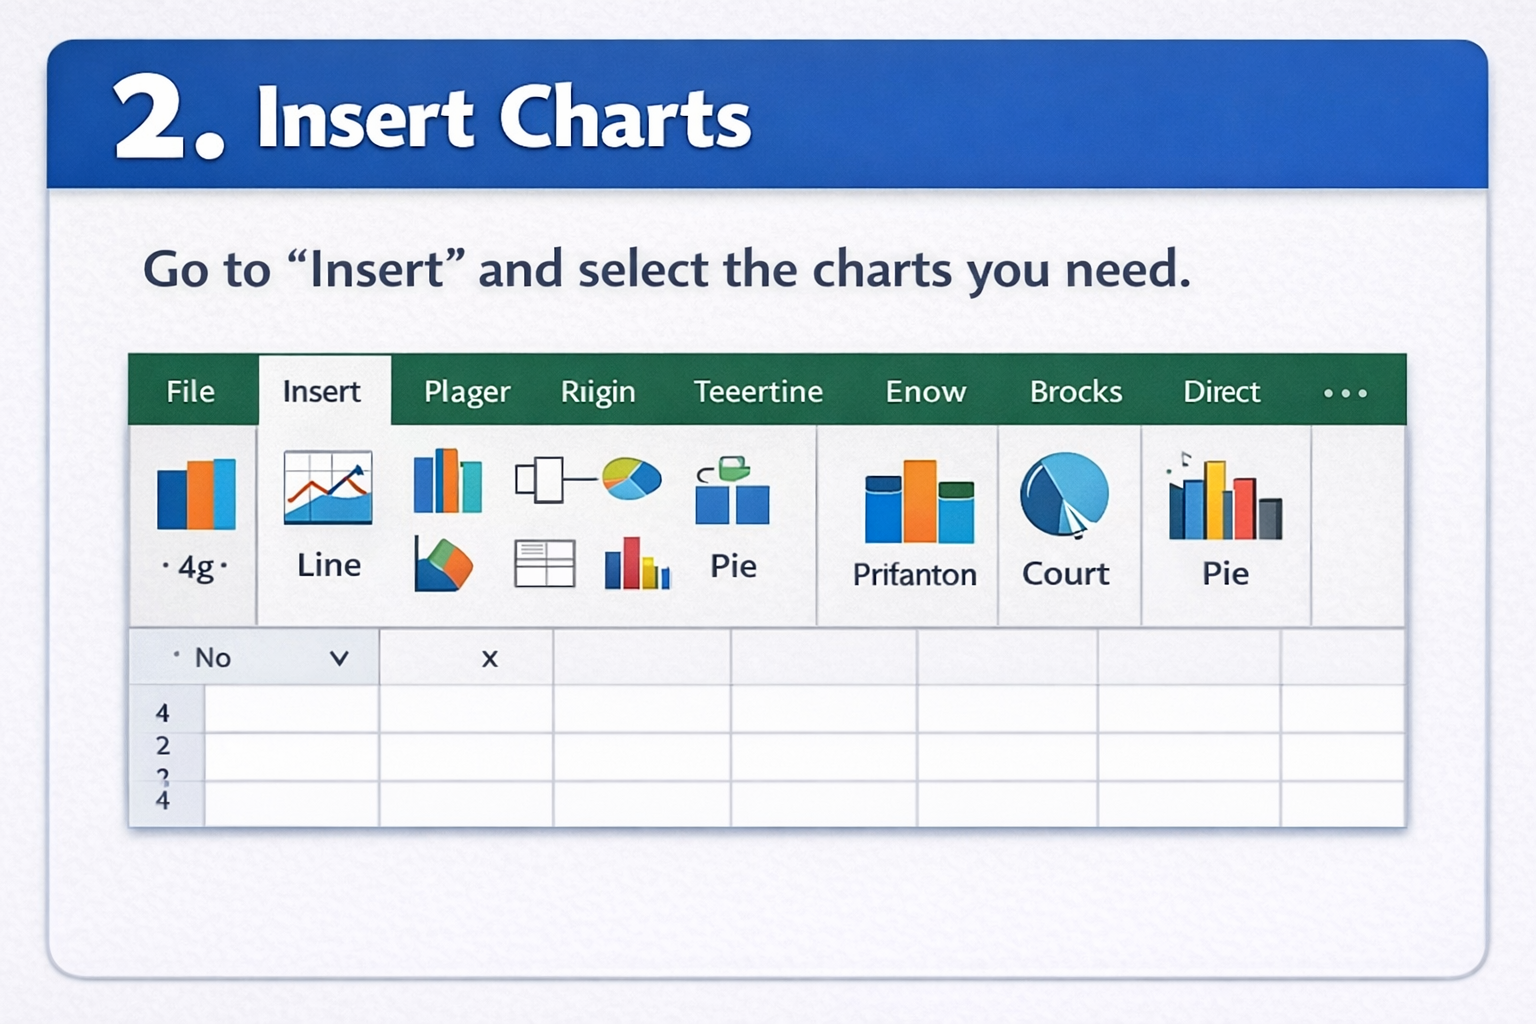
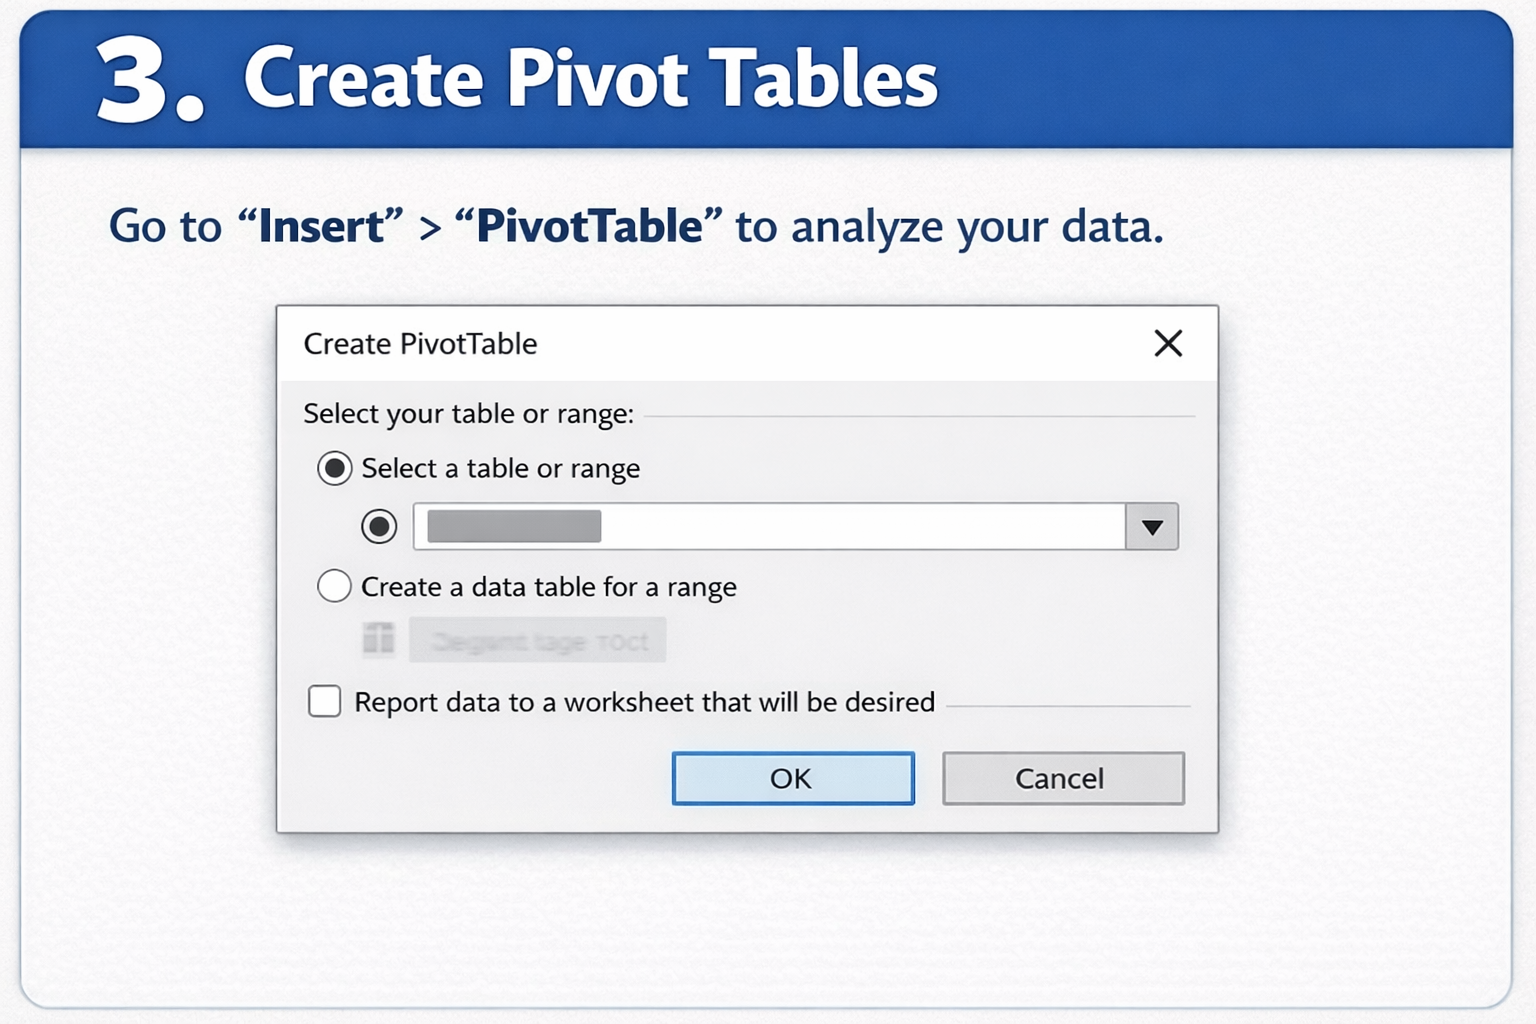
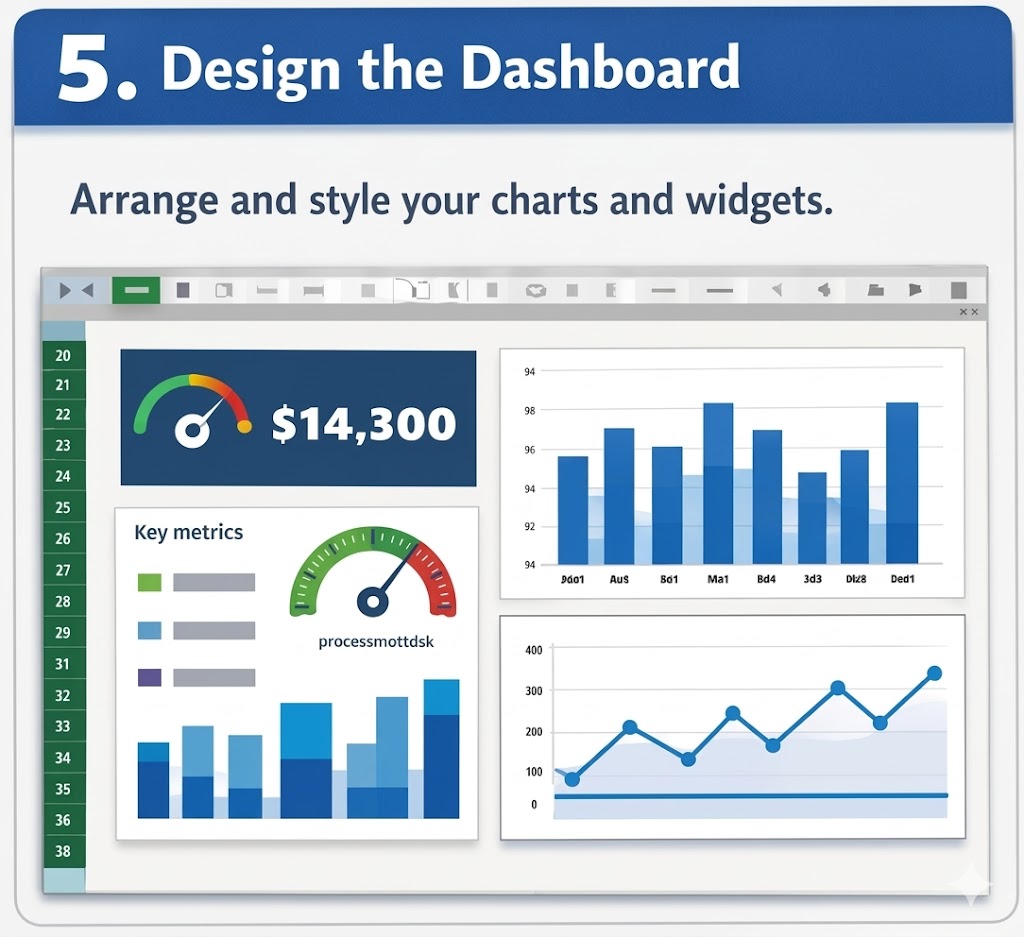
When designing your dashboard, focus on clarity and usability. Summarize key information with PivotTables and PivotCharts, which allow dynamic interaction and give users control over what they view.
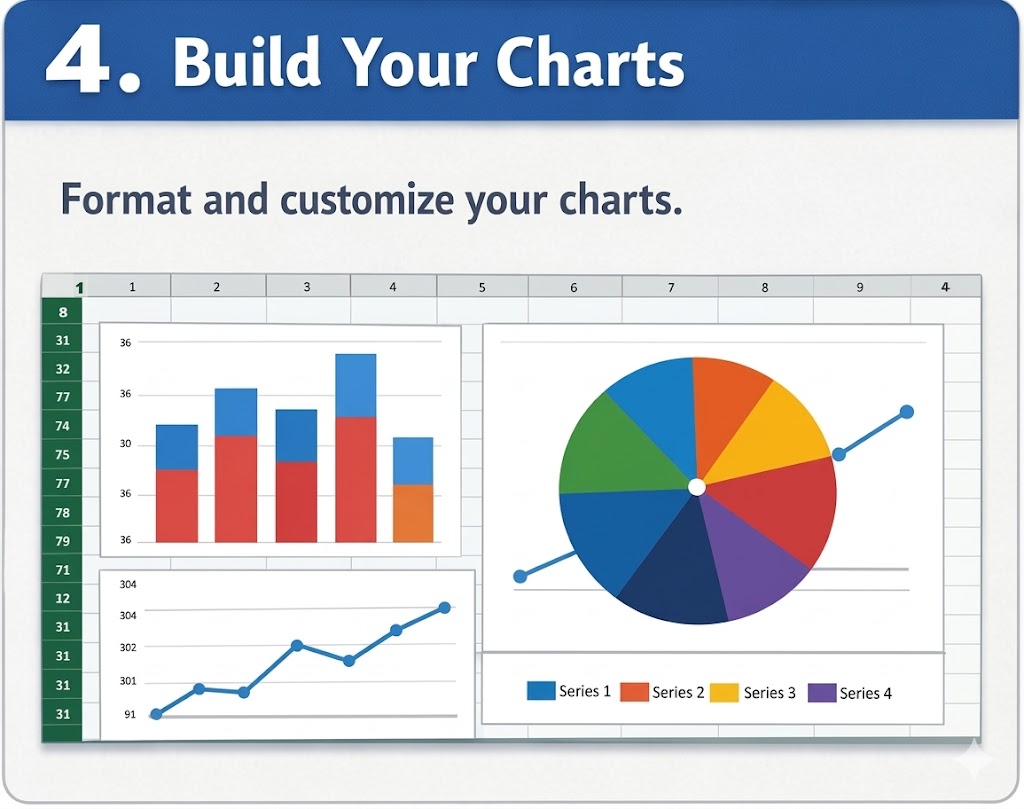
Choose charts wisely to communicate data effectively. Use bar, line, or pie charts depending on the data type, maintain consistent formatting, and avoid cluttering the dashboard with unnecessary elements.
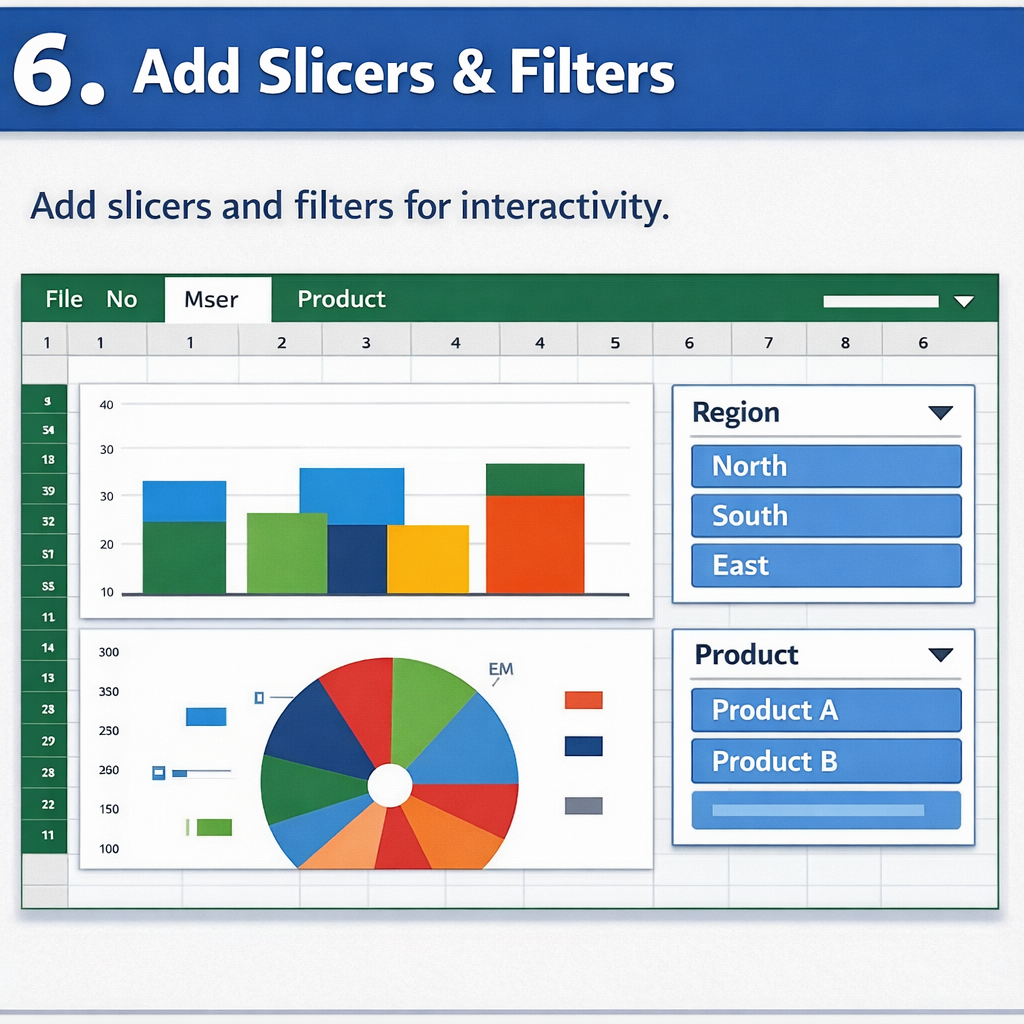
Enhance interactivity by adding slicers, drop-downs, and filters. These features allow users to explore data on their own and gain deeper insights.
Finally, test your dashboard. Gather feedback from your audience to ensure it’s intuitive, user-friendly, and meets its intended purpose.
Start building your dashboard in Excel today and explore advanced visualizations with ChartExpo to take your reporting to the next level.
How much did you enjoy this article?


Learn how to use sparklines in Excel to quickly visualize trends inside cells. Discover types, creation steps, customization, use cases, benefits, and best practices.

Learn what a confidence interval graph is, how to create it in Excel, and how to interpret results to make more reliable, data-driven decisions.

A correlation matrix in Excel helps identify relationships between variables. Learn how to create, read, and use it for effective data analysis.