Categories
Closing costs catch many buyers off guard, adding thousands of dollars to what they expected to pay. Knowing how to calculate closing costs before you reach the final table puts you in a far stronger position, letting you compare loan offers, set aside the right funds, and spot fees that may be negotiable.
This guide walks through every component of closing costs, from lender charges and government fees to prepaid insurance and escrow deposits.
You will also find a practical spreadsheet method and a step-by-step charting tutorial, complete with real data examples, so you can track and visualize the numbers with confidence.
Definition: How to calculate closing costs starts with understanding what they are: a collection of fees due at settlement that are entirely separate from the property purchase price.
The total typically covers lender charges, legal expenses, government recording fees, title insurance, and administrative costs, all of which must be settled before ownership legally transfers.
In most real estate transactions, both buyers and sellers may pay different types of final costs depending on the agreement. These costs are paid during the closing meeting, which is the final step before the deal is completed.
Closing costs are closely related to the mortgage because lenders charge fees for processing, underwriting, and approving the loan.
Because these fees directly raise the total cash needed to complete a transaction, knowing how to calculate closing costs in advance gives every party a clear financial picture before the deal is signed.
Knowing how to calculate closing costs before finalizing a deal makes the process safer and more predictable and helps you understand the total financial commitment instead of focusing only on the property price.
Before learning how to calculate closing costs, you need to understand what charges are included in the total. These costs come from different parties involved in the transaction.
When you know how to calculate closing costs for each party, responsibility is divided between buyer and seller, though the proportion varies by state, market, and negotiation.
Buyers typically absorb lender fees, appraisal charges, and insurance premiums, while sellers commonly cover agent commissions, transfer taxes, and any repair credits they have agreed to provide.
In some cases, the seller agrees to cover part of the buyer’s closing costs to complete the deal faster. When calculating closing costs, always check the purchase agreement to know who is responsible for each fee.
Seeing how to calculate closing costs across real transaction types makes the concept concrete. Each scenario below highlights a distinct fee structure and the forces driving those numbers.
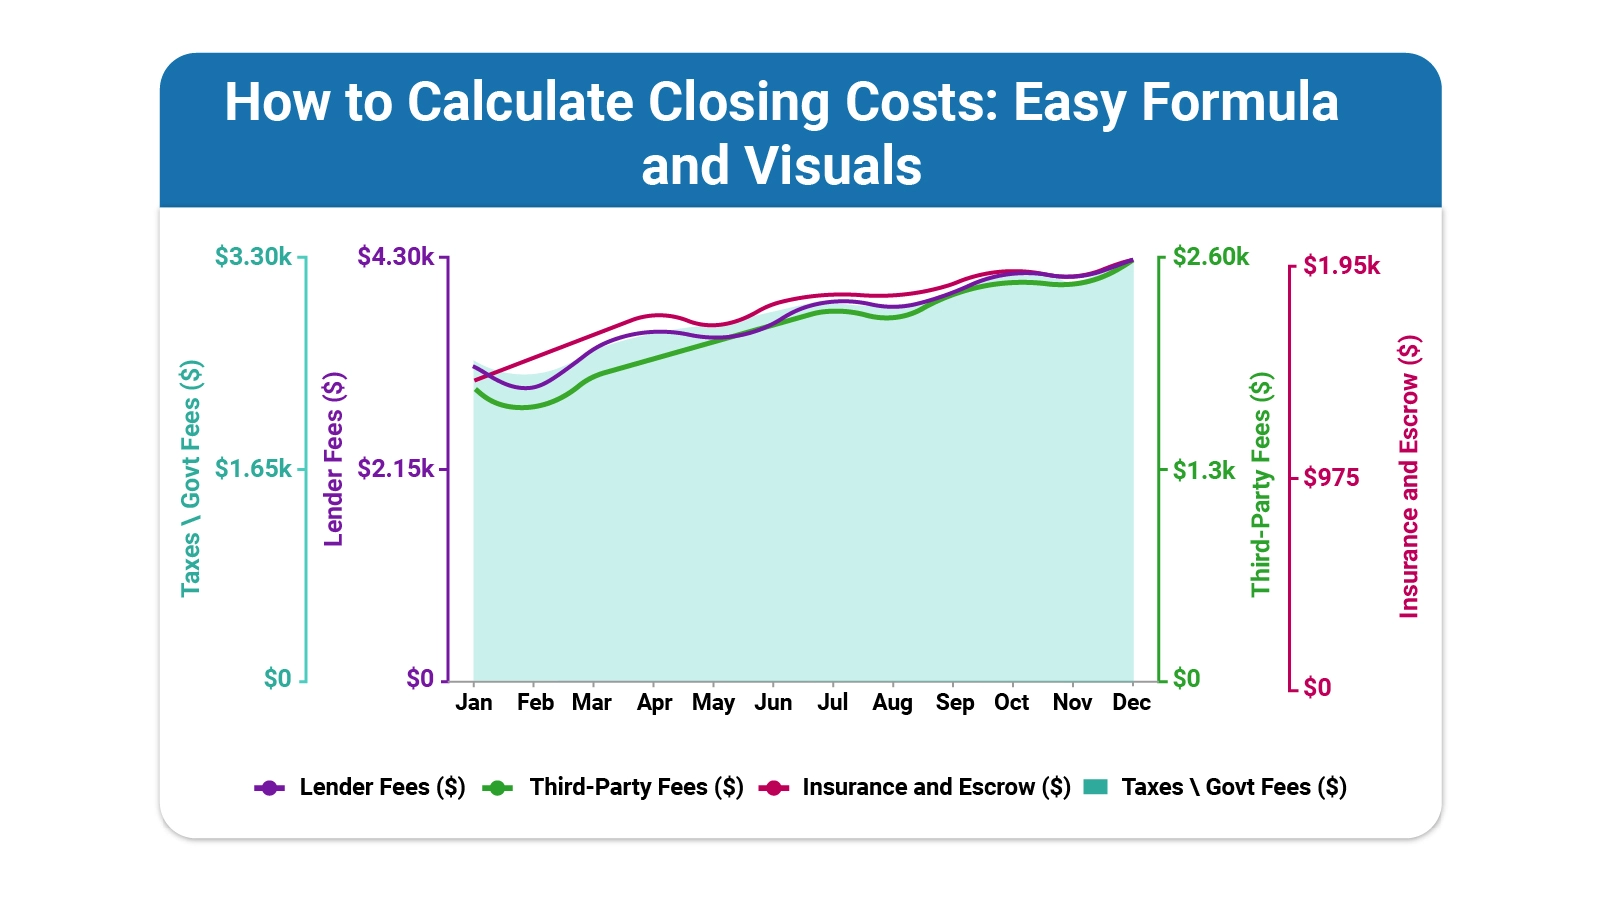
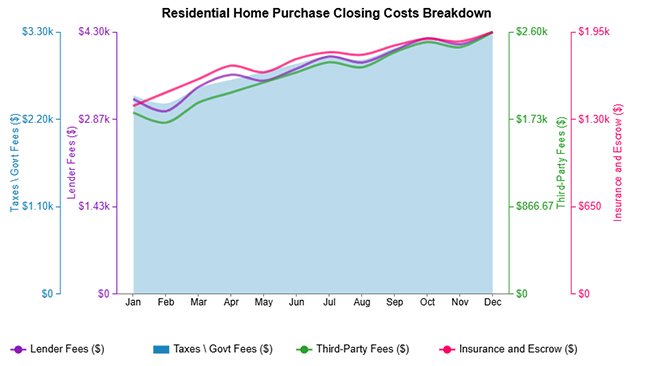
The residential home purchase example shows a steady increase in lender fees, taxes, third-party fees, and insurance costs throughout the year.
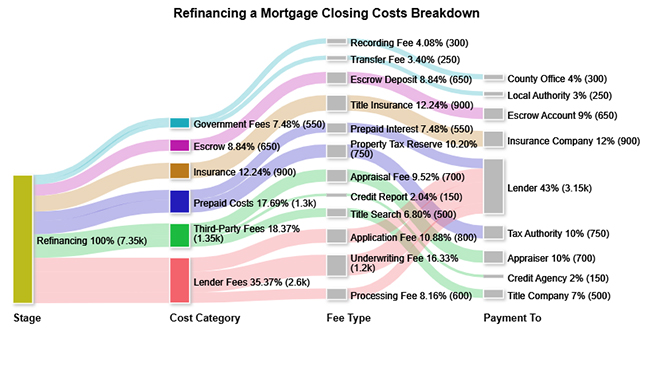
The refinancing a mortgage example shows that the borrower pays lender fees, appraisal charges, recording fees, and other costs to replace the old loan.
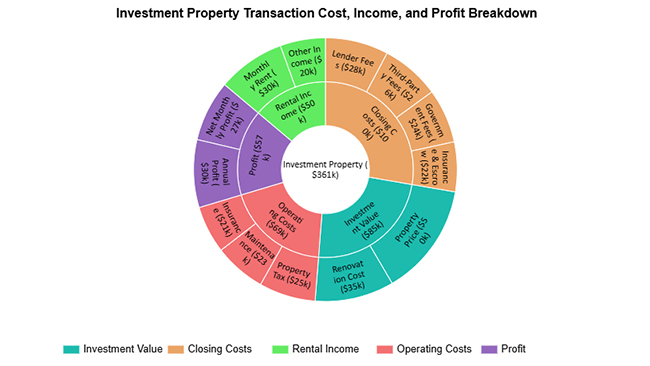
The investment property transaction cost, income, and profit breakdown example shows how investment value, final costs, income, expenses, and profit are distributed in an investment property transaction.
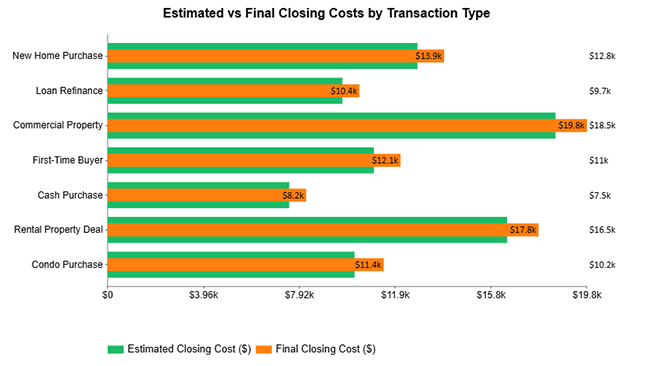
The estimated vs final costs by transaction type example shows how final costs differ from estimated costs across different property transactions.
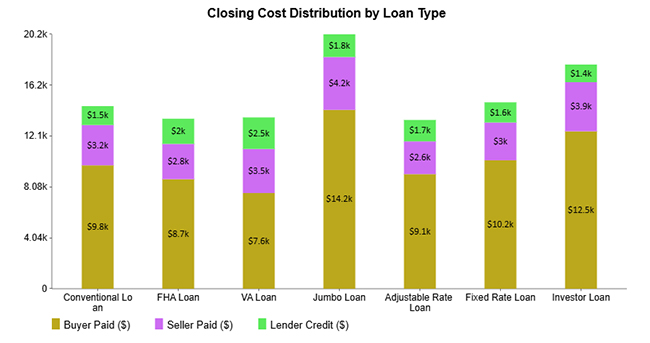
The cost distribution by loan type example shows how buyer payments, seller contributions, and lender credits combine to form the total closing cost for different loan types.
If you want to learn how to calculate closing costs, follow a simple step-by-step method. This approach helps you avoid missing any charges and ensures the total amount is accurate. Many investors also track these values in a real estate investment spreadsheet to keep calculations organized.
Pull together your loan estimate, which lists the amount borrowed, the interest rate, the loan product type, and any specific lender conditions. Several fee categories scale directly with the loan balance, so having accurate figures at this stage prevents compounding errors later.
Draft a comprehensive register of every charge that could appear at settlement. Your list should cover lender fees, attorney or title charges, government taxes, insurance premiums, escrow deposits, and any service fees from third parties, so no cost falls through the cracks.
Collect every bank charge in one subtotal: the origination fee, underwriting fee, processing fee, and application fee. Your lender is required to disclose these on the official loan estimate form, making this step relatively straightforward to verify.
Build a separate subtotal for every outside vendor: the property appraiser, home inspector, title agent, and closing attorney. These figures vary by property type, location, and provider, so gather actual quotes rather than using averages whenever possible.
Add the prepaid items that fund your future obligations: daily mortgage interest from the closing date to the month-end, the first year of homeowner’s insurance, and the initial property tax deposit into the escrow account. These are advance payments, not additional fees.
Finally, add all categories together to get the total costs. Review the total again, similar to checking a cost performance index, to make sure every fee is included and the calculation is accurate.
Analyzing closing costs in Google Sheets helps you understand how different expenses contribute to the total cost of a property transaction.
By organizing and visualizing your data, you can identify trends, compare categories, and make informed financial decisions. Follow these steps to perform effective analysis:
Start by listing all closing cost components such as lender fees, taxes, third-party fees, and insurance. Arrange the data in columns with time periods or categories for easy comparison.
Group related costs into categories to simplify analysis. This allows you to compare how each type of expense contributes to the overall closing cost.
Use Google Sheets functions like SUM and AVERAGE to calculate totals and identify trends over time. This helps you track how costs change across different periods.
Create Pivot Tables to summarize your data by category or time. This provides a quick overview of which costs are increasing or decreasing.
Convert your data into charts such as line graphs or area charts to visualize cost trends. For more advanced and interactive visuals, you can use ChartExpo to create clear and insightful dashboards.
Analyze your charts to understand how different cost components behave over time. Look for patterns, spikes, or steady increases that may impact your overall budget.
Include a final visualization, such as a multi-axis line chart that compares different closing cost components over time. This helps present trends clearly and makes it easier to understand how each expense contributes to the total cost.

Knowing how to calculate closing costs with precision converts a vague financial commitment into a concrete number you can plan around, supporting smarter decisions at every stage of the transaction.
Errors in how to calculate closing costs are surprisingly common and can create real financial pressure at settlement. Avoiding the mistakes below keeps your estimates reliable and your closing on track.
No universal formula exists; the total is derived by summing lender fees, third-party charges, government taxes, insurance premiums, escrow deposits, and prepaid items. This additive approach is the standard practice when calculating closing costs for any transaction type.
Sellers typically handle real estate agent commissions and transfer taxes, but may also contribute repair credits or cover a share of the buyer’s settlement charges as part of a negotiated concession.
Add the agent commission, attorney fees, applicable transfer taxes, and any buyer concessions you have agreed to; the sum represents the seller’s total closing cost obligation.
The total for how to calculate closing costs is settled at the closing meeting, the final appointment before title transfers to the new owner; no funds change hands before that date.
Property transactions involve far more cash than the listed price alone, and the gap between expectation and reality often comes down to how to calculate closing costs before the deal is done.
Buyers and sellers who build their numbers from actual fee schedules rather than rough estimates reach the closing table prepared, not blindsided.
Use a spreadsheet to organize every fee category, apply the step-by-step method outlined in this guide, and visualize the totals clearly.
Anyone who invests the effort to learn how to calculate closing costs before settlement reaches the table is prepared, and that preparation turns a complex process into a manageable, transparent one.
How much did you enjoy this article?


Calculate accounts receivable turnover ratio to measure credit collection speed, improve cash flow, and strengthen your financial strategy. Read on!
Change Management KPIs are the key to tracking adoption, performance, and ROI during transitions. Find out which metrics matter. Read on!
Data collection methods and techniques determine the quality of every insight you act on. Explore key approaches for gathering reliable data. Read on!