• Home
  • Tools dropdown img
    • Spreadsheet Charts

      • ChartExpo for Google Sheets
      • ChartExpo for Microsoft Excel
    • Power BI Charts

      • Power BI Custom Visuals by ChartExpo
    • Word Cloud

  • Charts dropdown img
    • Chart Category

      • Bar Charts
      • Circle Graphs
      • Column Charts
      • Combo Charts
      • Comparison Charts
      • Line Graphs
      • PPC Charts
      • Sentiment Analysis Charts
      • Survey Charts
    • Chart Type

      • Box and Whisker Plot
      • Clustered Bar Chart
      • Clustered Column Chart
      • Comparison Bar Chart
      • Control Chart
      • CSAT Survey Bar Chart
      • CSAT Survey Chart
      • Dot Plot Chart
      • Double Bar Graph
      • Funnel Chart
      • Gauge Chart
      • Likert Scale Chart
      • Matrix Chart
      • Multi Axis Line Chart
      • Overlapping Bar Chart
      • Pareto Chart
      • Radar Chart
      • Radial Bar Chart
      • Sankey Diagram
      • Scatter Plot Chart
      • Slope Chart
      • Sunburst Chart
      • Tornado Chart
      • Waterfall Chart
      • Word Cloud
    • Google Sheets
      Microsoft Excel
  • Services
  • Pricing
  • Contact us
  • Blog
  • Support dropdown img
      • Gallery
      • Videos
      • Contact us
      • FAQs
      • Resources
    • Please feel free to contact us

      atsupport@chartexpo.com

Categories
All Data Visualizations Data Analytics Surveys
Add-ons/
  • Google Sheets
  • Microsoft Excel
  • Power BI
All Data Visualizations Data Analytics Surveys
Add-ons
  • Google Sheets
  • Microsoft Excel
  • Power BI

We use cookies

This website uses cookies to provide better user experience and user's session management.
By continuing visiting this website you consent the use of these cookies.

Ok

ChartExpo Survey


Home > Blog > Microsoft Excel

Risk Assessment Template in Excel: A Complete Guide

What if a risk assessment template in Excel could decide the survival of your business? Strange thought, right?

Risk Assessment Template in Excel

Let me show you why it is not strange. Research indicates that 60% of small companies cease operations within six months of experiencing a significant data loss or disruption. Most of these companies had no structured risk plan.

Numbers do not lie. Risks ignored today often become costs tomorrow. This is where a risk assessment template in Excel comes in. It becomes a practical map of threats, impacts, and actions.

Think of it as a mirror that reflects what could go wrong and how prepared you really are. Without it, leaders rely on guesswork, and guesswork is a risky business move.

But where do you start? That’s where tools step in. A risk assessment template in Excel works hand in hand with other planning aids. This spans from the SWOT analysis template in Excel to performance dashboards. These resources keep data structured and decisions grounded.

Risk will always exist. The question is whether you want to see it before it strikes or after it damages. The choice lies in preparation. And preparation begins with the right template.

Let me guide you…

Table of Contents:

  1. What is a Risk Assessment Template in Excel?
  2. Why is the Excel Risk Assessment Template Important?
  3. What to Include in a Risk Assessment Template in Excel?
  4. Examples of Risk Assessment Template in Excel
  5. How to Create an Excel Risk Assessment Template?
  6. How to Analyze a Risk Assessment Template in Excel?
  7. How to Download and Use the Risk Assessment Excel Template?
  8. Benefits of a Risk Assessment Spreadsheet
  9. FAQs
  10. Wrap Up

What is a Risk Assessment Template in Excel?

Definition: A risk assessment template in Excel is a simple tool for spotting and tracking potential threats. It organizes risks in clear rows and columns. Each risk is described, rated, and given an action plan. This makes it easier to prioritize and monitor over time.

Many businesses combine this template with risk tolerance questionnaires to see how much risk the team can handle. Others link it to management reporting, allowing leaders to see updates quickly.

This template is flexible, easy to share, and practical for daily use. It helps teams stay ready for issues before they grow into larger problems.

Why is the Excel Risk Assessment Template Important?

Picture walking through a dark alley blindfolded. That’s how managing risks feels when there’s no clear plan in place. An Excel risk assessment template acts as a flashlight. It highlights threats, prioritizes responses, and guides better decisions before problems escalate.

This is why you should use this template:

  • Look for threats early: You can see risks systematically with the template. You have the opportunity to identify risks early and prevent them from becoming expensive problems.
  • Prioritizes risks: Not every risk carries the same weight. By scoring and ranking threats, the template helps you focus on the most urgent and impactful ones first.
  • Supports good decisions: Use of the template means that uncertainty is converted into explicit, actionable information. It filters out the noise so you can make informed decisions based on facts.
  • Enhances accountability: Each risk belongs to a team member, so everyone knows who is responsible. This reduces confusion and helps track progress effectively.
  • Saves time: All risk information is centralized, easy to access, and simple to update. This eliminates wasted effort searching through scattered documents and spreadsheets.

What to Include in a Risk Assessment Template in Excel?

Picture trying to assemble a puzzle without being able to look at the pieces. That’s what managing business risks is like without a template. An Excel risk template offers you everything in a single place, enabling you to clarify threats, assign actions, and monitor progress.

Here’s how to structure it:

  • Identify risks: List down all the potential risks your company can encounter. That way, the full range of possible issues is covered.
  • Risk category: Categorize risk in categories, like financial risk, operational risk, or strategic risk. Categories are meant to make patterns easier to notice.
  • Probability: Assess the likelihood of each risk occurring. This is a way to rank what else might need attention soon.
  • Average score: Learn how risky each threat is based on your perceived impact. The product of likelihood and impact makes the urgency indelible.
  • Risk scoring: Score each risk on another level of rating using probability and consequence. This measurement enables resources to be directed at issues with the highest rating.
  • Mitigation plan: Describe the steps to avoid or control each risk. A well-defined plan reduces threats to tasks that you can handle.
  • Responsibility assignment: Define by name who owns each risk with a responsibility assignment matrix template. This ensures accountability and prevents tasks from falling through the cracks.
  • Review date: Set regular review dates to update and track progress. Linking the template with dashboard templates in Excel can provide real-time visibility for easier monitoring.

Examples of Risk Assessment Template in Excel

Imagine trying to protect your business from every possible setback without a plan. It feels impossible. That is where a risk assessment template in Excel becomes a game-changer. It helps organize threats, assign responsibility, and track actions efficiently. These examples make it easier to see how this tool works in real scenarios:

  • Project management: Use the template to track risks in timelines, budgets, and deliverables. Linking tasks with a responsibility assignment matrix template ensures everyone knows their role.
  • Financial risks: Identify potential cash flow issues, investment losses, or market fluctuations that may impact your financial stability. Integrating the template with management reporting makes financial visibility instant and actionable.
  • Operational risks: Monitor risks related to processes, systems, or supply chains. Clear documentation in Excel ensures quick responses and fewer disruptions.
  • SWOT-based risk analysis: Combine traditional SWOT methods with your template for deeper insights. A SWOT analysis template in Excel helps visualize strengths, weaknesses, opportunities, and threats alongside identified risks.
  • Human resource risks: Track employee turnover, skill gaps, or compliance concerns. Pairing this with succession planning templates ensures teams remain resilient during transitions.
  • Extended risk analysis: For larger projects or long-term planning, expand the template to track emerging risks. Linking data with dashboard templates in Excel provides a real-time overview for faster decisions.

How to Create an Excel Risk Assessment Template?

Creating a risk assessment template in Excel is a straightforward process. The goal is to track risks, measure impact, and assign responsibility efficiently.

Follow these steps to make it much more powerful.

  1. Open Excel and set up columns: Start with a blank sheet. Create columns for risk name, category, likelihood, impact score, risk rating, mitigation plan, responsibility, and review date. Linking this to a responsibility assignment matrix template ensures every risk has a clear owner.
  2. Define scales: Decide how you will measure likelihood and impact. A simple 1 to 5 scale works well. It makes risk analysis easier and more consistent.
  3. Use conditional formatting: Apply color codes for high, medium, and low risks. This provides a visual snapshot so urgent risks stand out immediately.
  4. Add formulas: Use formulas to calculate risk rating automatically. This reduces errors and speeds up analysis. Formulas can combine likelihood and impact scores to provide a comprehensive assessment.
  5. Insert charts: Add bar or heat maps to visualize data. Pairing charts with dashboard templates in Excel helps management see risk trends at a glance.
  6. Save as a template: Save the file as a reusable template. This ensures every project starts with a structured approach. You can also combine it with risk tolerance questionnaires for deeper insights.

How to Analyze a Risk Assessment Template in Excel?

Have you ever tried reading a spreadsheet full of numbers and felt your brain start to cry? That is what creating and analyzing a risk assessment template in Excel can feel like without visuals. Numbers tell a story, but spotting trends and patterns in raw data is tough.

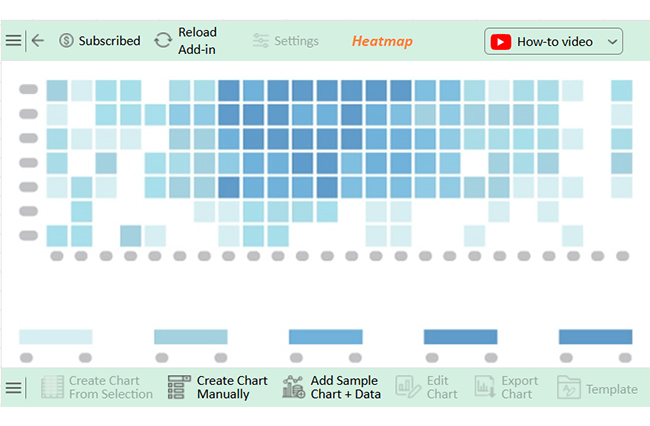
Excel has basic charts, but they often fall short when you need clear, actionable insights. This is where ChartExpo comes in. It transforms dry data into easy-to-understand visuals. Suddenly, risk scores, impact levels, and likelihoods jump off the page. Data becomes not just readable, but meaningful.

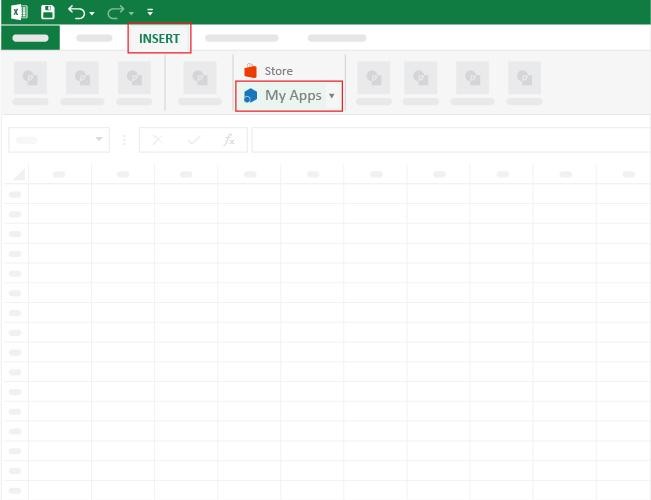
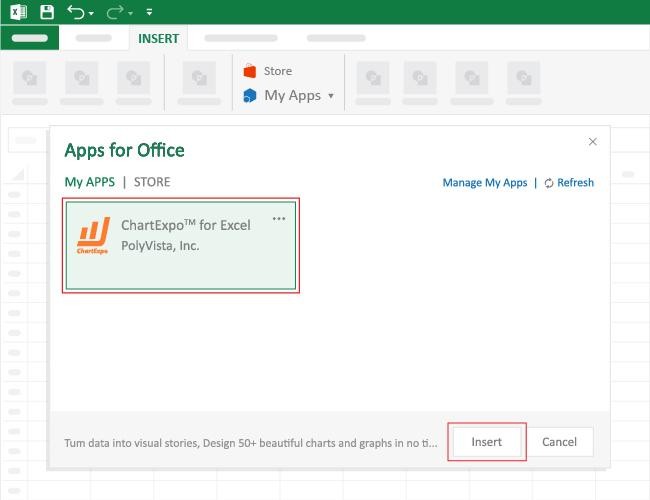
How to Install ChartExpo in Excel?

  1. Open your Excel application.
  2. Open the worksheet and click the “Insert” menu.
  3. You’ll see the “My Apps” option.
  4. In the Office Add-ins window, click “Store” and search for ChartExpo on my Apps Store.
  5. Click the “Add” button to install ChartExpo in your Excel.

ChartExpo charts are available both in Google Sheets and Microsoft Excel. Please use the following CTAs to install the tool of your choice and create beautiful visualizations with a few clicks in your favorite tool.

Example

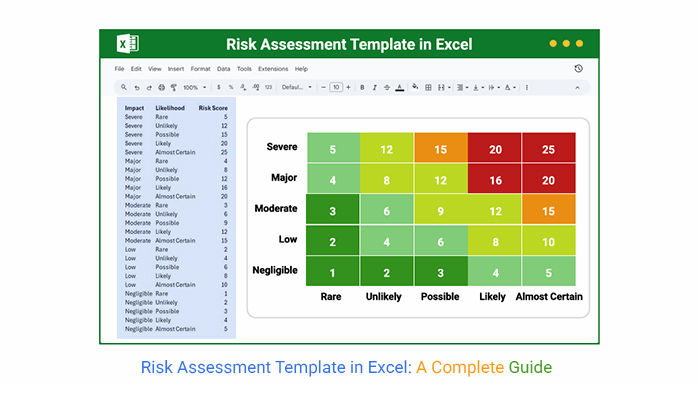
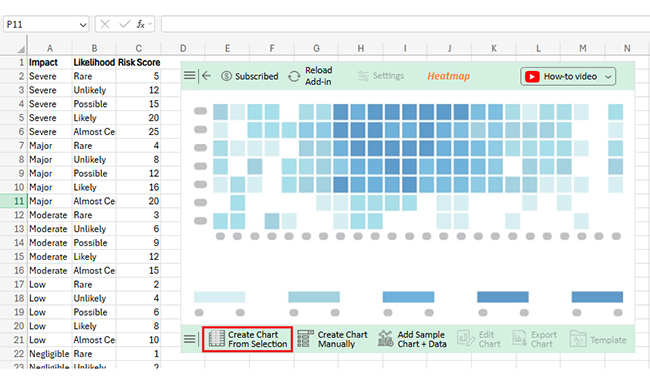
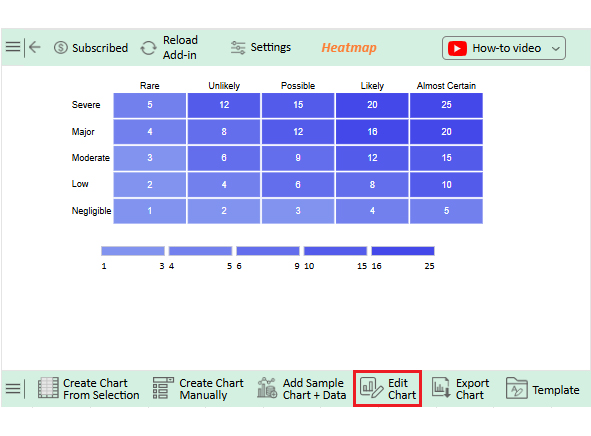
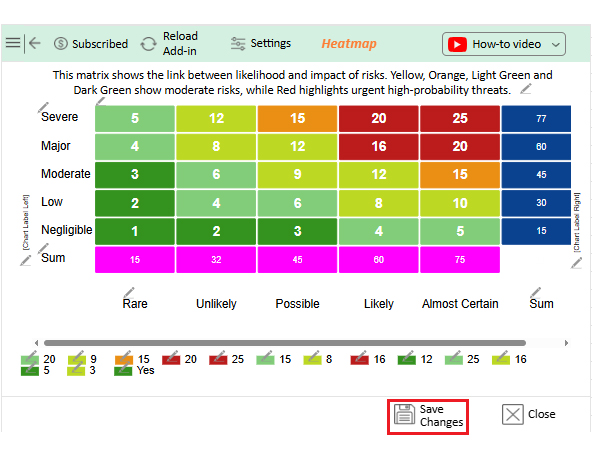
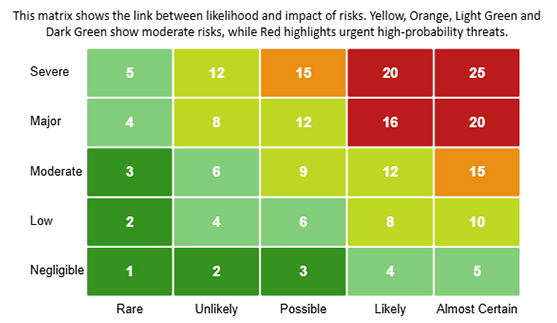
Let’s analyze this risk assessment sample data in Excel using ChartExpo.

Impact Likelihood Risk Score
Severe Rare 5
Severe Unlikely 12
Severe Possible 15
Severe Likely 20
Severe Almost Certain 25
Major Rare 4
Major Unlikely 8
Major Possible 12
Major Likely 16
Major Almost Certain 20
Moderate Rare 3
Moderate Unlikely 6
Moderate Possible 9
Moderate Likely 12
Moderate Almost Certain 15
Low Rare 2
Low Unlikely 4
Low Possible 6
Low Likely 8
Low Almost Certain 10
Negligible Rare 1
Negligible Unlikely 2
Negligible Possible 3
Negligible Likely 4
Negligible Almost Certain 5
  • To get started with ChartExpo, install ChartExpo in Excel.
  • Now, click on My Apps from the INSERT menu.
Risk Assessment Template in Excel
  • Choose ChartExpo from My Apps, then click Insert.
Risk Assessment Template in Excel
  • Once it loads, choose the “Heatmap” from the charts list.
Risk Assessment Template in Excel
  • After clicking on the chart, you will see the Heatmap on the screen.
Risk Assessment Template in Excel
  • Click the “Create Chart From Selection” button after selecting the data from the sheet, as shown.
Risk Assessment Template in Excel
  • If you want to add anything to the chart, click the Edit Chart button:
Risk Assessment Template in Excel
  • You can change the legend type from “Settings”.
Risk Assessment Template in Excel
  • Change legend colors from “Legend Properties” as follows.
Risk Assessment Template in Excel
  • Change label position from “Chart Horizontal Label Properties”.
Risk Assessment Template in Excel
  • You can increase the font size for better readability.
Risk Assessment Template in Excel
  • You can also add a chart description.
Risk Assessment Template in Excel
  • Click the “Save Changes” button to persist the changes.
Risk Assessment Template in Excel
  • Your final chart will appear as follows.
Risk Assessment Template in Excel

Insights

  • Highest risk (25): Almost Certain likelihood requires immediate mitigation.
  • Significant risks (15–20): Likely or Almost Certain need strong preventive strategies.
  • Moderate risks (9–12): Medium exposure. Proactive monitoring and controls are recommended.
  • Low/negligible risks (1–6): Minimal impact can be accepted or reviewed periodically.

How to Download and Use the Risk Assessment Excel Template?

Imagine having a tool that spots business risks before they become problems. A risk assessment template in Excel can do that. It organizes threats, tracks mitigation plans, and assigns responsibility. Using it correctly can save time and prevent costly mistakes.

How do you get started?

  1. Find a reliable template: Search for a reputable source offering a pre-built Excel template. Ensure it includes sections for risk name, category, likelihood, impact, mitigation, and responsibility.
  2. Download the file: Click a download link and save it to your computer. Ensure that your version of Excel supports it.
  3. Open and personalize: Open the template in Excel. Customize the columns for your business.
  4. Enter risk data: Develop information on each of the managed risks. Input the likelihood, impact scores, and mitigation plans.
  5. Analyze risks: Use formulas and conditional formatting to highlight high-priority risks. Pair it with dashboard templates in Excel for a visual summary of key threats.
  6. Review and update: Set regular intervals to review and update risks. This keeps the template accurate and relevant for ongoing decision-making.

Benefits of a Risk Assessment Spreadsheet

Managing risks without a clear plan is like driving blindfolded. You never know what’s coming next. A risk assessment template in Excel provides a clear vision. It organizes threats, tracks mitigation steps, and clearly highlights priorities. Here’s how the right template can transform how your business handles uncertainty:

  • Improves visibility: All risks are listed in one place. You can see potential threats at a glance.
  • Enhances decision-making: Data-driven insights guide more intelligent choices. Using the template alongside management reporting ensures leadership has accurate information.
  • Promotes accountability: Each risk is assigned to a responsible team member. A responsibility assignment matrix template helps track ownership and progress.
  • Saves time: Everything is structured and ready to use. Teams spend less time hunting for information.
  • Supports proactive risk management: High-priority risks are flagged early. This allows for corrective actions to be taken before problems escalate.

FAQs

What are the 5 parts of a risk assessment?

A risk assessment includes the following:

  • Hazard identification
  • Risk analysis
  • Risk evaluation
  • Mitigation measures
  • Monitoring

Each part helps spot threats, measure impact, plan responses, assign responsibility, and track progress over time.

What is the 5 by 5 risk assessment template?

The five-by-five template rates risks on a 1 to 5 scale for likelihood and impact. Scores are multiplied to give a risk rating. It helps prioritize risks and focus on the most critical areas quickly.

Wrap Up

Creating and analyzing a risk assessment template in Excel is not just a task. It is a strategy to protect your business. A clear template shows risks, assigns responsibility, and tracks mitigation steps. This makes your operations smarter and safer.

Understanding what key risk indicators are helps you spot serious risks early. The sooner you identify problems, the faster you can take action.

The first step is identifying threats. Use columns for likelihood, impact, and mitigation.

Next, assign ownership. Pair your template with a responsibility assignment matrix template to make accountability clear. Each team member knows their tasks, which reduces confusion and ensures follow-up.

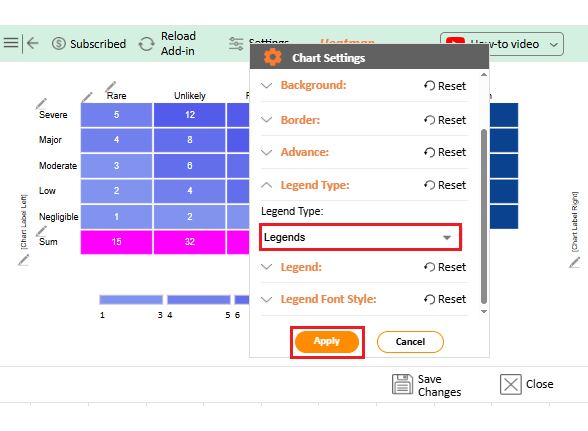
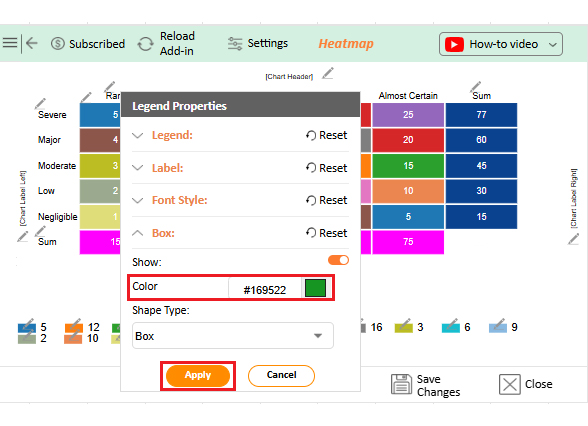
Visualization matters. Excel charts are fundamental and sometimes complex to read. Installing ChartExpo brings your data to life. Risks, trends, and scores become easy to understand, allowing you to create reports that impress stakeholders.

Integration is important. Combine your risk template with a business development plan template to align risks with growth. Track team effort using a time-tracking template for Excel. This ensures resources are used efficiently and priorities are clear.

So…Do not hesitate. Start using your risk assessment template in Excel today.

Start by installing ChartExpo. This will enhance visualization, risk tracking, and data analysis. The right tools transform risk management from guesswork into a transparent and actionable process.

How much did you enjoy this article?

ExcelAd2
Start Free Trial!
158762

Related articles

next previous
Microsoft Excel11 min read

Structured Reference in Excel Explained Simply

Structured reference in Excel simplifies formulas and adapts to growing data. This guide shows examples and best practices to boost accuracy and speed.

Microsoft Excel13 min read

How to Create Control Chart in Excel?

Learn how to create and use a control chart in Excel to monitor process performance, identify variations, and make data-driven decisions.

Microsoft Excel12 min read

Forecasting Using Excel: Visual Methods That Work

Forecasting using Excel helps businesses turn past data into clear predictions. It shows trends, highlights patterns, and guides decisions with accuracy.

Microsoft Excel11 min read

Sparkline in Excel: Visual Insights at a Glance

Sparkline in Excel helps visualize trends fast. Learn to create, customize, and analyze sparklines with ChartExpo for clearer, actionable insights.

Microsoft Excel13 min read

15 Financial Charts in Excel Every Business Should Use

Explore financial charts and graphs in Excel to improve data analysis, reveal trends, and make smarter business decisions with clear visual insights.

ChartExpo logo

Turn Data into Visual
Stories

CHARTEXPO

  • Home
  • Gallery
  • Videos
  • Services
  • Pricing
  • Contact us
  • FAQs
  • Privacy policy
  • Terms of Service
  • Sitemap

TOOLS

  • ChartExpo for Google Sheets
  • ChartExpo for Microsoft Excel
  • Power BI Custom Visuals by ChartExpo
  • Word Cloud

CATEGORIES

  • Bar Charts
  • Circle Graphs
  • Column Charts
  • Combo Charts
  • Comparison Charts
  • Line Graphs
  • PPC Charts
  • Sentiment Analysis Charts
  • Survey Charts

TOP CHARTS

  • Sankey Diagram
  • Likert Scale Chart
  • Comparison Bar Chart
  • Pareto Chart
  • Funnel Chart
  • Gauge Chart
  • Radar Chart
  • Radial Bar Chart
  • Sunburst Chart
  • see more
  • Scatter Plot Chart
  • CSAT Survey Bar Chart
  • CSAT Survey Chart
  • Dot Plot Chart
  • Double Bar Graph
  • Matrix Chart
  • Multi Axis Line Chart
  • Overlapping Bar Chart
  • Control Chart
  • Slope Chart
  • Clustered Bar Chart
  • Clustered Column Chart
  • Box and Whisker Plot
  • Tornado Chart
  • Waterfall Chart
  • Word Cloud
  • see less

RESOURCES

  • Blog
  • Resources
  • YouTube
SIGN UP FOR UPDATES

We wouldn't dream of spamming you or selling your info.

© 2026 ChartExpo, all rights reserved.