• Home
  • Tools dropdown img
    • Spreadsheet Charts

      • ChartExpo for Google Sheets
      • ChartExpo for Microsoft Excel
    • Power BI Charts

      • Power BI Custom Visuals by ChartExpo
    • Word Cloud

  • Charts dropdown img
    • Chart Category

      • Bar Charts
      • Circle Graphs
      • Column Charts
      • Combo Charts
      • Comparison Charts
      • Line Graphs
      • PPC Charts
      • Sentiment Analysis Charts
      • Survey Charts
    • Chart Type

      • Box and Whisker Plot
      • Clustered Bar Chart
      • Clustered Column Chart
      • Comparison Bar Chart
      • Control Chart
      • CSAT Survey Bar Chart
      • CSAT Survey Chart
      • Dot Plot Chart
      • Double Bar Graph
      • Funnel Chart
      • Gauge Chart
      • Likert Scale Chart
      • Matrix Chart
      • Multi Axis Line Chart
      • Overlapping Bar Chart
      • Pareto Chart
      • Radar Chart
      • Radial Bar Chart
      • Sankey Diagram
      • Scatter Plot Chart
      • Slope Chart
      • Sunburst Chart
      • Tornado Chart
      • Waterfall Chart
      • Word Cloud
    • Google Sheets
      Microsoft Excel
  • Services
  • Pricing
  • Contact us
  • Blog
  • Support dropdown img
      • Gallery
      • Videos
      • Contact us
      • FAQs
      • Resources
    • Please feel free to contact us

      atsupport@chartexpo.com

Categories
All Data Visualizations Data Analytics Surveys
Add-ons/
  • Google Sheets
  • Microsoft Excel
  • Power BI
All Data Visualizations Data Analytics Surveys
Add-ons
  • Google Sheets
  • Microsoft Excel
  • Power BI

We use cookies

This website uses cookies to provide better user experience and user's session management.
By continuing visiting this website you consent the use of these cookies.

Ok

ChartExpo Survey


Home > Blog > Microsoft Excel

How to Move Columns in Excel for Clean Data Layouts

How do I move columns in Excel? This is a question that’s crossed the mind of anyone juggling spreadsheets.

Excel is a powerful tool used by over 750 million people globally. From small businesses to global enterprises, it’s essential for organizing data. However, many users need to learn how to move columns in Excel efficiently, a simple skill that can save hours.

How to Move Columns in Excel

Imagine you’re preparing a report with columns scattered everywhere. Instead of copying, pasting, and risking mistakes, there’s a faster way. Moving columns in Excel is simple once you know the steps. It transforms chaos into order with a few clicks and drags.

Why does this matter? Time is precious. Studies show we spend an average of 3 hours a week fixing spreadsheet errors. Learning shortcuts, like moving columns efficiently, boosts productivity and frees time for what matters most.

Whether you’re managing a team budget, analyzing sales data, or tracking inventory, Excel is your go-to tool. Knowing how to move columns in Excel improves your workflow. It simplifies tasks, keeps data accurate, and reduces stress.

Ready to upgrade your Excel game? Let’s dive into practical tips and techniques.

Table of Content:

  1. Can You Move Columns in Excel?
  2. How to Move Columns in Excel?
  3. What is the Shortcut to Move Columns in Excel?
  4. Different Methods For Moving Columns in Excel
    • How to Move a Column with Cut and Paste?
    • How to Copy and Move the Column?
    • How to Move a Column by Dragging It?
  5. Why Do These Methods Matter?
  6. How to Move One Column in Excel?
  7. How to Move Several Columns in Excel?
  8. Change the Columns Order in Excel Using VBA
  9. Rearrange Excel Column Using Column Manager
  10. How to Move Columns in Excel Table?
  11. Top 5 Charts for Visualizing Moved Column Data in Excel
  12. How to Analyze Moving Columns in Excel?
  13. Benefits of Shift Columns in Excel 
  14. Best Practices for Reorder Columns in Excel
  15. How to Move Columns in Excel: FAQs
  16. Wrap Up

First…

Can You Move Columns in Excel?

1. Drag and Drop Method

  • Select the column by clicking its letter.
  • Hover over the column border until you see a four-sided arrow.
  • Hold Shift, then drag the column to the new location.

2. Cut and Insert Method

  • Select the column and press Ctrl + X (Cut).
  • Right-click the destination column and select Insert Cut Cells.

How to Move Columns in Excel?

Are you cleaning up a spreadsheet, reorganizing data, or simply trying to make your file more manageable? Knowing how to move columns effectively can save you a lot of time.

How? Here are a few methods that will make rearranging your columns a breeze.

What is the Shortcut to Move Columns in Excel?

The shortcut to move columns in Excel is:
  1. Select the column(s) you want to move.
  2. Press and hold Shift on your keyboard.
  3. Move the cursor to the edge of the selection until it turns into a four-sided arrow (cross icon).
  4. Click and drag the column to the new location.
  5. Release the mouse button, then release Shift.

Different Methods For Moving Columns in Excel

  1. How to Move a Column with Cut and Paste?
  2. How to Copy and Move the Column?
  3. How to Move a Column by Dragging It?

How to Move a Column with Cut and Paste?

Cut and paste is one of the quickest ways to move a column in Excel, and here’s how you can do it:

Cut and move the column

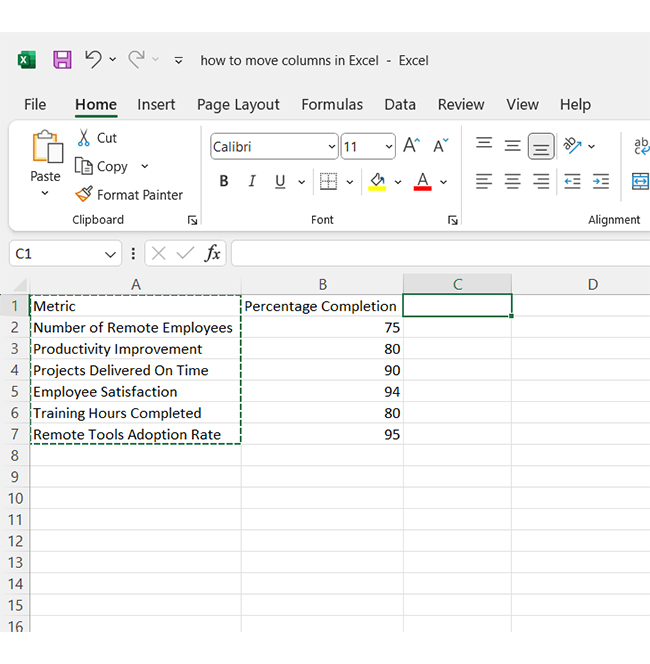
Start by selecting the entire column you want to move (click on the column header). Then, go to the Home tab and click Cut (the scissors icon), or press `Ctrl + X` on your keyboard. You’ll see the column highlighted with a dashed border, indicating it’s ready to move.

Highlight Column for Learning How to Move Columns in Excel

Next, go to the new location where you want the column to appear and right-click.

Go to Location and Right Click for Learning How to Move Columns in Excel

Choose “Insert Cut Cells”, and the column will instantly shift to the new position.

Choose Insert Cut Cells for Learning How to Move Columns in Excel

How to Copy and Move the Column?

First, select the cell or column you want to copy. This is the part where you decide what data you want to move.

Instead of dragging it, choose “Copy” from the menu. You’ll find this option in the right-click menu or under the “Home” tab at the top of your screen. It’s a simple action, but it gets the job done.

Choose Copy from Menu for Learning How to Move Columns in Excel

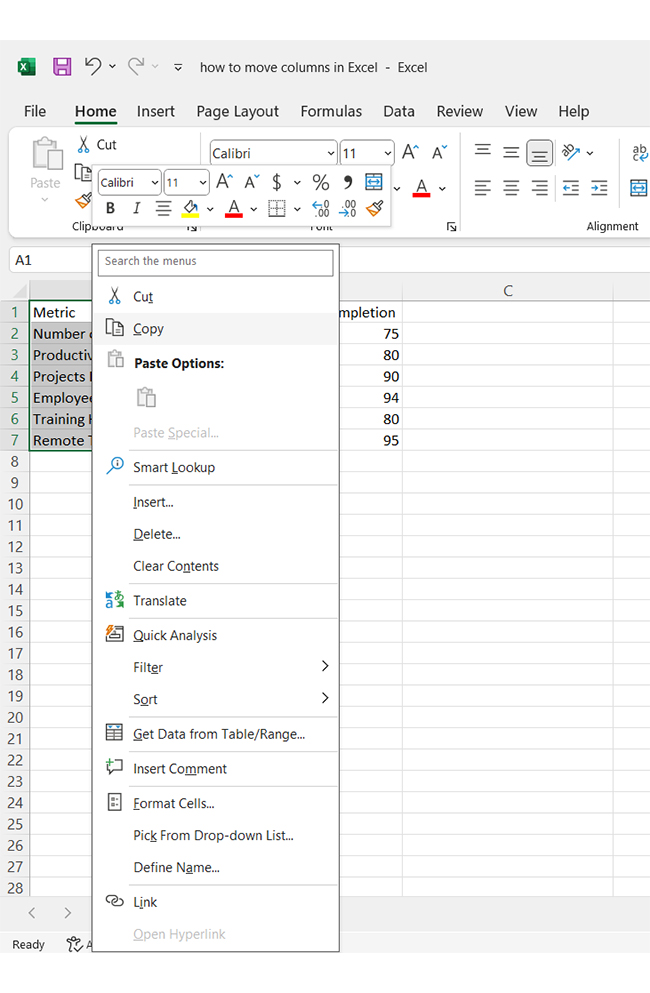
Next, select where you want to place the copied data. Right-click in the destination area, and this time, pick “Insert Copied Cells” from the menu. This will move your data and shift the existing cells down, creating space for your copy.

Pick Insert Copied for Learning How to Move Columns in Excel

Your data will appear as follows:

Data will Appear for Learning How to Move Columns in Excel

Copy between spreadsheets

You can also move or copy columns between different workbooks. Simply copy the column as described, then go to the new workbook. Click on the cell where you want to paste, and hit Ctrl + V to paste the column into the new spreadsheet.

How to Move a Column by Dragging It?

If you’re looking for the simplest and most visual method, dragging and dropping is a great option. Here’s how it works:

Cut and move

  • Click on the column header to select the column you want to move. Hover your mouse over the border of the column until the cursor changes to a four-sided arrow.
  • Then, drag the column to a new location. If there’s data in the new spot, you’ll see a warning asking if you want to replace it—click OK to confirm.

Copy and move

  • Hold down the Ctrl key while dragging the column. This will create a duplicate of the original column in the new location. The data in the new column location will be overwritten; keep that in mind.

Copy and move the column

  • Hove your mouse to the edge of the column you want to move (e.g., Column H).
  • Wait for the pointer to change to a four-way arrow.
  • Hold the Shift key and drag and drop the column to its new spot. Excel will make space for it, removing the old location.
  • Example: Move Column H between Columns K and L. The order will update, and Column K will shift to J.
  • To move multiple columns, hold Shift and drag the edge of the last column.

Why Do These Methods Matter?

They give you flexibility when reorganizing your data, in case you’re working with a small table or a massive dataset. You use cut-and-paste for precision, drag-and-drop for ease, or copy-and-insert to keep everything intact. Mastering these simple techniques can help you become an Excel pro instantly.

How to Move One Column in Excel?

Step 1: Select the Column

Click on the header of the column you want to move to highlight it.

Step 2: Cut the Column

Press Ctrl + X (Windows) or Cmd + X (Mac) to cut the column.

Step 3: Choose the Destination

Click on the header of the column where you want to place the cut column.

Step 4: Paste the Column

Press Ctrl + V (Windows) or Cmd + V (Mac) to paste the column into the new location.

How to Move Several Columns in Excel?

Step 1: Select the Columns

Click and drag across the headers of the columns you want to move to highlight them.

Step 2: Cut the Columns

Press Ctrl + X (Windows) or Cmd + X (Mac) to cut the selected columns.

Step 3: Choose the Destination

Click on the header of the first column where you want to place the cut columns.

Step 4: Paste the Columns

Press Ctrl + V (Windows) or Cmd + V (Mac) to paste the columns into their new location.

Change the Columns Order in Excel Using VBA

Step 1: Open the VBA Editor

Press Alt + F11 to open the VBA Editor in Excel.

Step 2: Insert a New Module

In the VBA Editor, go to Insert > Module to create a new module.

Step 3: Write the VBA Code

Enter the VBA code to reorder the columns. Customize the code to specify the desired column order.

Step 4: Run the Code

Press F5 or click Run to execute the code. The columns will be rearranged according to the specified order.

Rearrange Excel Column Using Column Manager

Step 1: Access the Column Manager

Open the Column Manager from your Excel add-in or tool that supports column management.

Step 2: Select the Columns

Choose the columns you want to rearrange from the list provided in the tool.

Step 3: Adjust the Order

Drag and drop the columns or use the up/down buttons in the Column Manager to set the desired order.

Step 4: Apply Changes

Click Apply or OK to confirm the new arrangement of columns in your worksheet.

How to Move Columns in Excel Table?

Step 1: Select the Column

Click on the column header of the column you want to move.

Step 2: Press and Hold Shift

Hold down the Shift key on your keyboard.

Step 3: Drag the Column

Move your cursor to the edge of the selected column until it turns into a four-sided arrow, then click and drag the column to the desired position.

Step 4: Drop the Column

Release the mouse button to place the column in its new location.

Step 5: Release Shift Key

Let go of the Shift key to finalize the column movement without overwriting data.

Top 5 Charts for Visualizing Moved Column Data in Excel

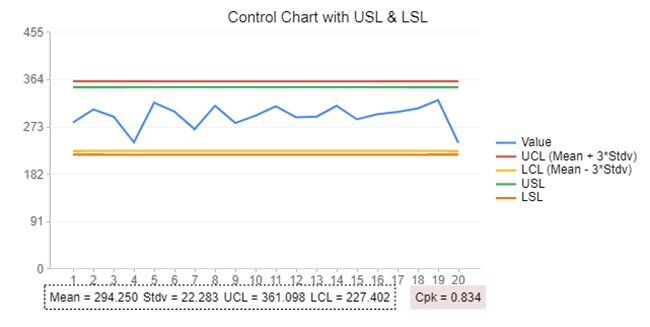
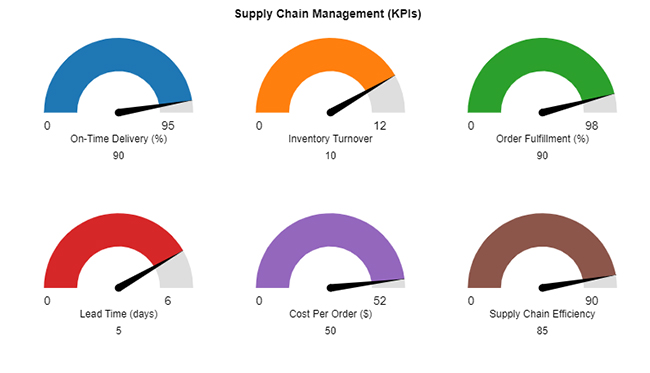
Here are the top 5 advanced charts created in Excel using ChartExpo.

Control Chart

Control Chart After Learning How to Move Columns in Excel

Box and Whisker Column Chart

Box and Whisker Column Chart After Learning How to Move Columns in Excel

Gauge Chart

Gauge Chart After Learning How to Move Columns in Excel

Sankey Chart

Sankey Chart After Learning How to Move Columns in Excel

Progress Circle Chart

Progress Circle Chart After Learning How to Move Columns in Excel

How to Analyze Moving Columns in Excel?

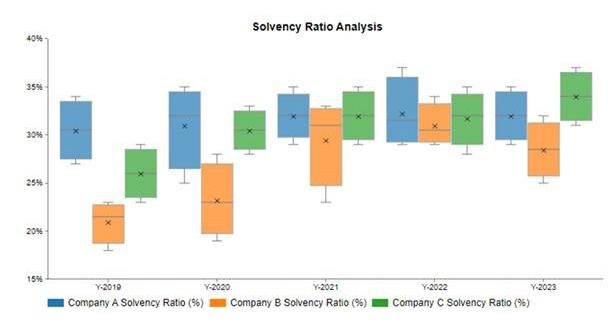
Data analysis can feel like trying to make sense of a jumbled puzzle. You’ve got numbers, percentages, and ratios flying at you from all directions. But making sense of it? That’s a whole other challenge.

Excel does the math, but to make those numbers clear and visually compelling, you need to add a chart in Excel that effectively communicates your insights.

Enter ChartExpo. This tool transforms your data from dull spreadsheets into insightful, easy-to-read visuals. With ChartExpo, you can effortlessly perform trend analysis in Excel and view your ratios and trends the way they’re meant to be seen—without the hassle.

Let’s learn how to install ChartExpo in Excel.

  1. Open your Excel application.
  2. Open the worksheet and click the “Insert” menu.
  3. You’ll see the “My Apps” option.
  4. In the Office Add-ins window, click “Store” and search for ChartExpo on my Apps Store.
  5. Click the “Add” button to install ChartExpo in your Excel.

ChartExpo charts are available both in Google Sheets and Microsoft Excel. Please use the following CTAs to install the tool of your choice and create beautiful visualizations with a few clicks in your favorite tool.

Example

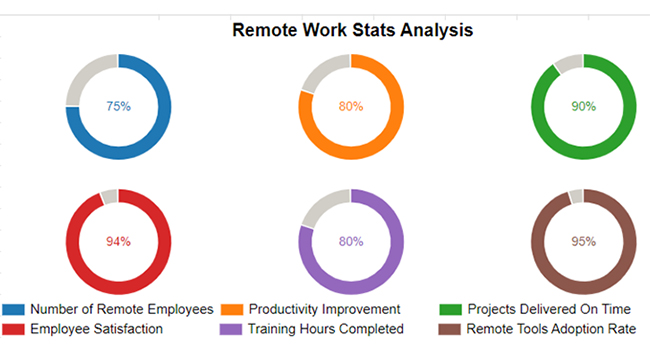
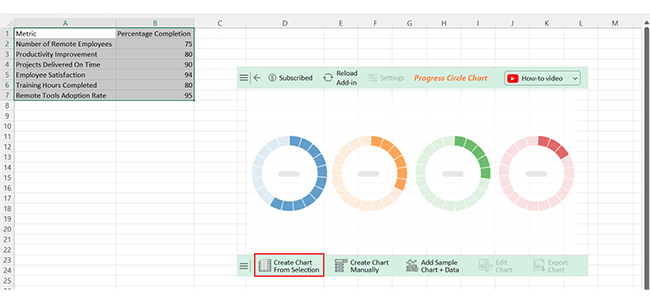
Let’s dive into analyzing and interpreting data using ChartExpo with the sample data below in Excel.

Metric Percentage Completion
Number of Remote Employees 75
Productivity Improvement 80
Projects Delivered On Time 90
Employee Satisfaction 94
Training Hours Completed 80
Remote Tools Adoption Rate 95
  • To get started with ChartExpo, install ChartExpo in Excel.
  • Now Click on My Apps from the INSERT menu.
insert chartexpo in excel
  • Choose ChartExpo from My Apps, then click Insert.
open chartexpo in excel
  • Once it loads, scroll through the charts list to locate and choose the “Progress Circle Chart”.
Search Progress Circle Chart in Excel
  • You will see a Progress Circle Chart on the screen.
See Progress Circle Chart After Learning How to Move Columns in Excel
  • Click the “Create Chart From Selection” button after selecting the data from the sheet, as shown.
Click Create Chart From Selection After Learning How to Move Columns in Excel
  • ChartExpo will generate the visualization below for you.
Initial Visual After Learning How to Move Columns in Excel
  • If you want to add anything to the chart, click the Edit Chart button:
  • Click the pencil icon next to the Chart Header to change the title.
  • It will open the properties dialog. Under the Text section, you can add a heading in Line 1 and enable Show.
  • Give the appropriate title of your chart and click the Apply button.
Add Chart Header After Learning How to Move Columns in Excel
  • You can add the (%) with all values and change the precision to 1:
Add Postfix After Learning How to Move Columns in Excel
  • You can click on Settings and change the variation type:
Click on Settings After Learning How to Move Columns in Excel
  • Click the “Save Changes” button to persist the changes made to the chart.
Click Save Changes After Learning How to Move Columns in Excel
  • Your final Progress Circle Chart will look like the one below.
Final How to Move Columns in Excel

Insights

  • Employee satisfaction: 94%
  • Project delivery on time: 90%
  • Remote tools adoption:95%
  • Productivity improvement: 80%
  • Training completion: 80%

Streamline Charts by Effectively Moving Columns in Microsoft Excel:

  1. Open your Excel Application.
  2. Install ChartExpo Add-in for Excel from Microsoft AppSource to create interactive visualizations.
  3. Select the Progress Circle Chart from the list of charts.
  4. Select your data.
  5. Click on the “Create Chart from Selection” button.
  6. Customize your chart properties to add header, axis, legends, and other required information.

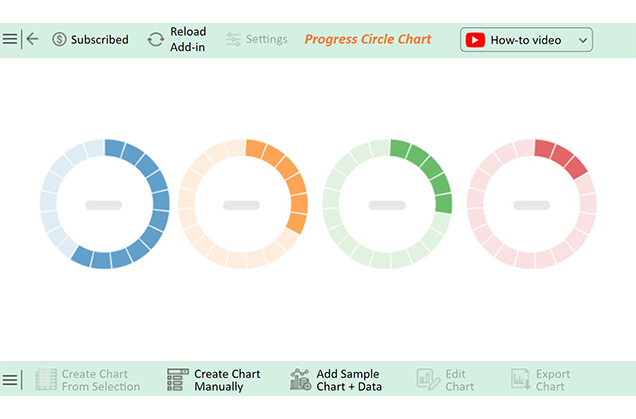
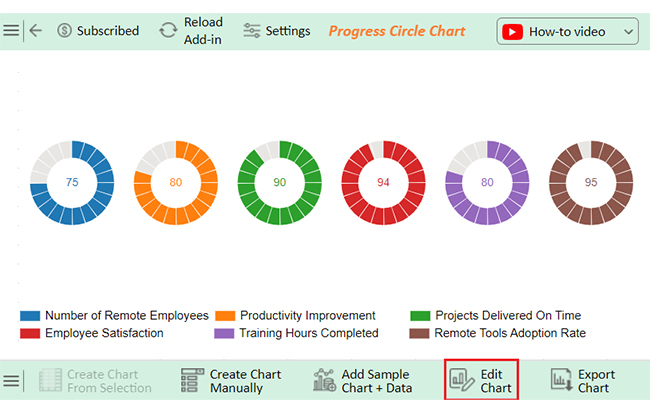
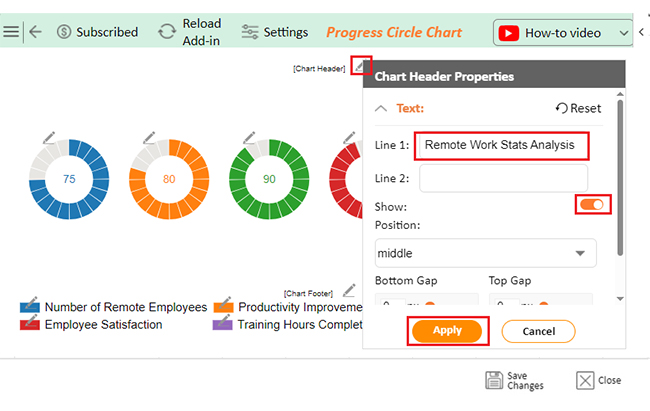
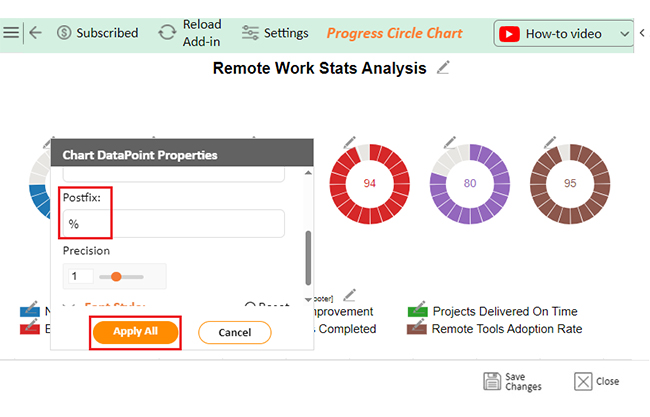
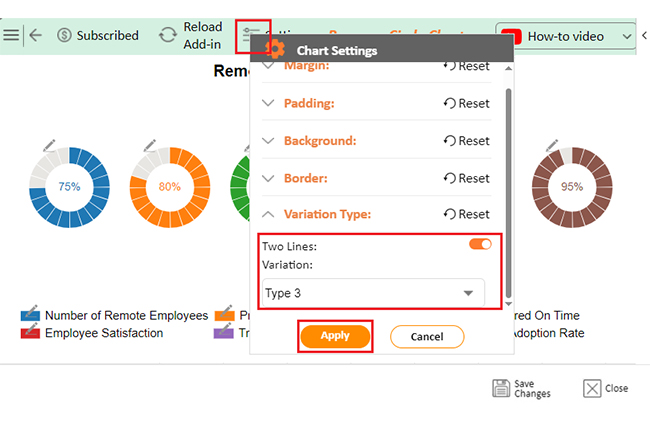
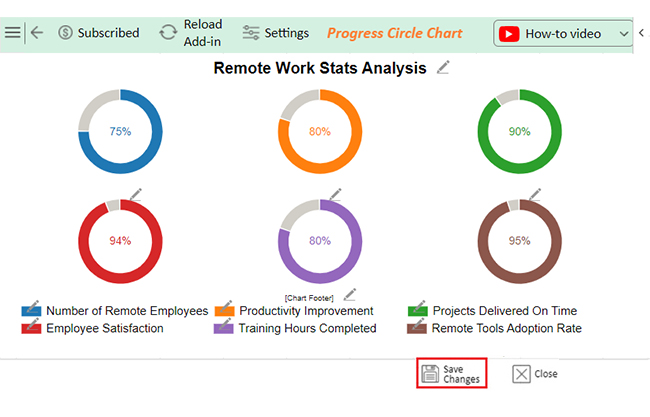
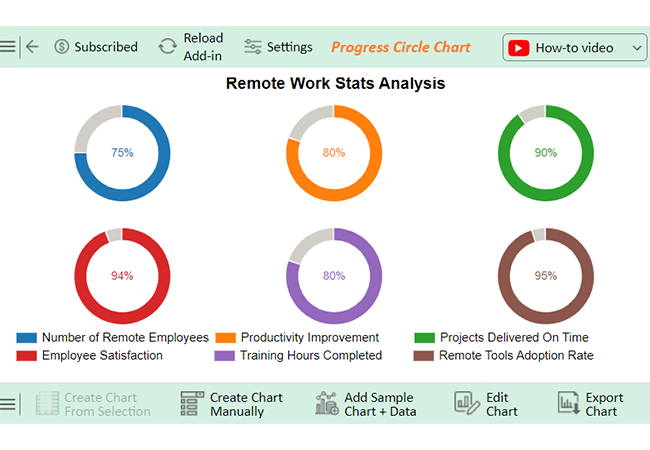
The following video will help you create a Progress Circle Chart in Microsoft Excel.

Benefits of Shift Columns in Excel

  1. Better Data Organization: Quickly rearrange columns to improve the structure of your dataset.
  2. Time-Saving: Moving columns with the Shift + Drag method is faster than cut-paste.
  3. Preserves Data Integrity: Prevents overwriting existing data by shifting columns instead of replacing them.
  4. Enhances Data Analysis: Helps reorder data for better readability and comparison.
  5. Maintains Formatting: Keeps cell formatting, formulas, and references intact.

What are the Best Practices for Reorder Columns in Excel?

Reordering columns in Excel seems simple, but it’s easy to make mistakes. Don’t worry; there are some of the best practices to help you avoid problems and stay efficient.

Here’s how to do it the right way:

  • Plan before reordering: Take a moment to plan; think about how you want your data to look. Don’t just move columns randomly.
  • Use Drag-and-Drop for simplicity: Drag-and-drop is quick and easy for small changes. Click the column header, drag it, and drop it where you want.
  • Cut and paste for large data sets: Drag-and-drop can be messy when working with large data. Use cut-and-paste instead; it’s cleaner and ensures everything stays in place.
  • Use Excel’s table feature: Reordering is easier if your data is in a table. Excel will adjust formulas and formatting automatically.
  • Check for formula dependencies: Before moving columns, check for formulas. Reordering can break them if they rely on specific column positions.
  • Preserve data integrity: Make sure you’re preserving data integrity by not overwriting any important information. Double-check your actions to avoid errors and maintain accuracy.
  • Save your work: Save your file before making changes. If something goes wrong, you can easily undo it.

How to Move Columns in Excel: FAQs

How do I move columns in Excel without moving other columns?

To move a column in Excel without affecting others, follow these steps:

  • Select the column you want to move.
  • Right-click and choose “Cut” or press Ctrl+X.
  • Right-click the destination column and select “Insert Cut Cells.”

How do you move columns in Excel with the keyboard?

  • Select the column you want to move.
  • Press Ctrl+X to cut.
  • Select the destination column.
  • Press Ctrl+Shift+ (plus sign) to insert the cut column.

What is the easiest way to switch columns in Excel?

The easiest way to switch columns in Excel is as follows:

  • Select the first column you want to switch.
  • Cut it (Ctrl+X).
  • Select the second column.
  • Right-click and choose Insert Cut Cells to swap their positions.

Wrap Up

Moving columns in Excel is a simple and useful task; it helps you organize data more effectively. You can complete the process quickly using drag-and-drop or the cut-and-paste method.

To move a column, first select the entire column. Next, use the drag-and-drop method to position it where needed or utilize the cut-and-paste function to move the column.

Excel also allows you to adjust the column width after moving. This ensures your data fits properly in the new column. You can also sort the data in the new column to organize it better.

Remember, you can always undo the action if you make a mistake. Excel’s undo feature allows you to quickly correct any errors.

Conclusively, moving columns can help improve the layout of your spreadsheet, making your data easier to read and understand. This is a simple yet powerful feature. It helps you manage your data more effectively.

Do not hesitate.

Start using the moving columns in Excel feature and rearrange your data needed in just a few clicks.

How much did you enjoy this article?

ExcelAd2
Start Free Trial!
144892

Related articles

next previous
Microsoft Excel13 min read

Excel for Teachers for Insightful Preparation

Excel for teachers simplifies grading, tracks attendance, and organizes data. Find its key features, expert tips, and how ChartExpo enhances data visualization.

Microsoft Excel14 min read

How to Make a Cash Flow Diagram in Excel?

Learn how to make a Cash Flow Diagram in Excel. It will help you learn to visualize and analyze inflows and outflows of your business cash flow.

Microsoft Excel11 min read

Succession Planning Template for Long-Term Success

Succession Planning Templates help businesses prepare for leadership changes. Learn to create, analyze, and use them for seamless transitions and growth.

Microsoft Excel10 min read

Grant Tracking Spreadsheet: Insights Made Easy

A Grant Tracker Spreadsheet helps track funding, deadlines, and expenses in Excel. Learn to use grant tracking templates, analyze data, and stay organized.

Microsoft Excel10 min read

What is Excel Software Used for: A Complete Guide

What is Excel software used for? It organizes, analyzes, and manages data. Explore its workplace applications, benefits, and top tips for efficiency and more.

ChartExpo logo

Turn Data into Visual
Stories

CHARTEXPO

  • Home
  • Gallery
  • Videos
  • Services
  • Pricing
  • Contact us
  • FAQs
  • Privacy policy
  • Terms of Service
  • Sitemap

TOOLS

  • ChartExpo for Google Sheets
  • ChartExpo for Microsoft Excel
  • Power BI Custom Visuals by ChartExpo
  • Word Cloud

CATEGORIES

  • Bar Charts
  • Circle Graphs
  • Column Charts
  • Combo Charts
  • Comparison Charts
  • Line Graphs
  • PPC Charts
  • Sentiment Analysis Charts
  • Survey Charts

TOP CHARTS

  • Sankey Diagram
  • Likert Scale Chart
  • Comparison Bar Chart
  • Pareto Chart
  • Funnel Chart
  • Gauge Chart
  • Radar Chart
  • Radial Bar Chart
  • Sunburst Chart
  • see more
  • Scatter Plot Chart
  • CSAT Survey Bar Chart
  • CSAT Survey Chart
  • Dot Plot Chart
  • Double Bar Graph
  • Matrix Chart
  • Multi Axis Line Chart
  • Overlapping Bar Chart
  • Control Chart
  • Slope Chart
  • Clustered Bar Chart
  • Clustered Column Chart
  • Box and Whisker Plot
  • Tornado Chart
  • Waterfall Chart
  • Word Cloud
  • see less

RESOURCES

  • Blog
  • Resources
  • YouTube
SIGN UP FOR UPDATES

We wouldn't dream of spamming you or selling your info.

© 2025 ChartExpo, all rights reserved.