• Home
  • Tools dropdown img
    • Spreadsheet Charts

      • ChartExpo for Google Sheets
      • ChartExpo for Microsoft Excel
    • Power BI Charts

      • Power BI Custom Visuals by ChartExpo
    • Word Cloud

  • Charts dropdown img
    • Chart Category

      • Bar Charts
      • Circle Graphs
      • Column Charts
      • Combo Charts
      • Comparison Charts
      • Line Graphs
      • PPC Charts
      • Sentiment Analysis Charts
      • Survey Charts
    • Chart Type

      • Box and Whisker Plot
      • Clustered Bar Chart
      • Clustered Column Chart
      • Comparison Bar Chart
      • Control Chart
      • CSAT Survey Bar Chart
      • CSAT Survey Chart
      • Dot Plot Chart
      • Double Bar Graph
      • Funnel Chart
      • Gauge Chart
      • Likert Scale Chart
      • Matrix Chart
      • Multi Axis Line Chart
      • Overlapping Bar Chart
      • Pareto Chart
      • Radar Chart
      • Radial Bar Chart
      • Sankey Diagram
      • Scatter Plot Chart
      • Slope Chart
      • Sunburst Chart
      • Tornado Chart
      • Waterfall Chart
      • Word Cloud
    • Google Sheets
      Microsoft Excel
  • Services
  • Pricing
  • Contact us
  • Blog
  • Support dropdown img
      • Gallery
      • Videos
      • Contact us
      • FAQs
      • Resources
    • Please feel free to contact us

      atsupport@chartexpo.com

Categories
All Data Visualizations Data Analytics Surveys
Add-ons/
  • Google Sheets
  • Microsoft Excel
  • Power BI
All Data Visualizations Data Analytics Surveys
Add-ons
  • Google Sheets
  • Microsoft Excel
  • Power BI

We use cookies

This website uses cookies to provide better user experience and user's session management.
By continuing visiting this website you consent the use of these cookies.

Ok

ChartExpo Survey


Home > Blog > Microsoft Excel

How to Share Excel Workbook With Charts and Visuals

How to share an Excel workbook? This question is more relevant than ever as teams strive to collaborate effectively. Excel remains a cornerstone for managing and analyzing data. Its wide range of usage worldwide makes it one of the most popular workplace tools. But sharing a workbook isn’t always as seamless as expected.

Did you know that poorly managed file sharing can lead to lost productivity and errors? A study by McKinsey found that employees spend nearly 20% of their workweek searching for or consolidating information. Sharing Excel workbooks reduces this waste and keeps everyone aligned.

How to Share Excel Workbook

However, Excel’s collaboration features are not flawless. Issues like version control problems, restricted simultaneous editing, and compatibility hiccups often arise. These can frustrate teams and disrupt workflows. Understanding how to share an Excel workbook effectively is critical for avoiding these pitfalls and boosting efficiency.

What if you could do it all smarter? Modern solutions like cloud integrations and add-ons enhance Excel’s collaborative capabilities. They simplify access, improve data accuracy, and allow real-time edits. Knowing these tools and techniques makes sharing more efficient and stress-free.

This blog post will guide you through everything you need to know about how to share Excel workbook files. It will provide practical tips to improve teamwork, minimize errors, and save time. Let’s explore how to make collaboration smoother, faster, and more productive.

Table of Contents:

  1. What is a Shared Worksheet in Excel?
  2. How to Share Excel Workbook?
  3. How to Share Files in Excel with Multiple Users?
  4. How to Share Excel Sheets with One User and Protect Change Tracking?
  5. How to Edit Excel Shared Workbook?
  6. How to Remove Users from Excel Shared Workbook?
  7. How to Unshare a Workbook in Excel?
  8. What are the Tips for Using Sharing Excel Workbook?
  9. How to Visualize Data in a Shared Excel Workbook?
  10. What are the Benefits of Sharing Excel Sheets?
  11. What are the Limitations of Excel Shared Workbooks?
  12. Wrap Up

First…

What is a Shared Worksheet in Excel?

Definition: A shared worksheet in Excel allows multiple users to work on the same file simultaneously. It enables collaboration by updating changes in real-time. You can edit, format, and analyze data together. This reduces the need for multiple versions of a file.

Shared worksheets are useful for team projects and data management. However, some advanced features may be limited. To use it, save the workbook on a shared network or cloud service like OneDrive or SharePoint.

How to Share Excel Workbook?

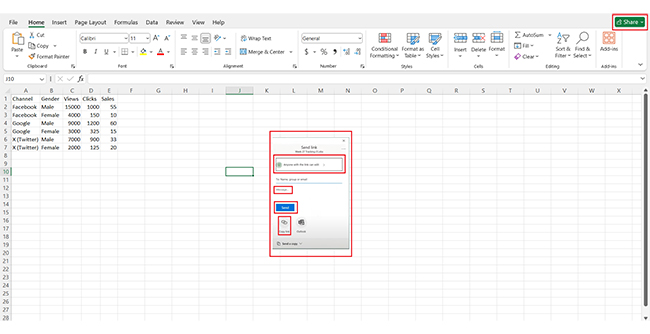
To share an Excel workbook, click “Share” to pick the people you want to collaborate with. Otherwise, you can copy the link and pass it along to others, as illustrated below.

Click Share to Pick the People for Learning How to Share Excel Workbook

How to Share Files in Excel with Multiple Users?

Sharing files in Excel with multiple users is simple and efficient. Let’s see the steps:

  1. Open your workbook: Make sure the file you want to share is ready.
  2. Click “Share Workbook (Legacy)”: This option is usually found under the “Review” tab or in advanced settings.
Under Review Tab for Learning How to Share Excel Workbook
  1. Mark the checkbox and press the “OK” button, as the example shows.
Click OK for Learning How to Share Excel Workbook
  1. Click OK: Confirm your selection.
Conform Your Selection for Learning How to Share Excel Workbook
  1. Your workbook is now ready to be shared with multiple users.
Ready to Be Shared with Multiple Users for Learning How to Share Excel Workbook

How to Share Excel Sheets with One User and Protect Change Tracking?

Sharing an Excel file doesn’t mean compromising security or tracking changes. You can work together seamlessly with a few steps while keeping everything organized and protected. Here’s how:

  • Save the Workbook to OneDrive or SharePoint: Save your file to OneDrive or SharePoint to make it accessible for sharing and collaboration. It ensures your data is stored securely in the cloud and available anywhere.
  • Click “Share”: Look for the Share button in the top-right corner of Excel. Clicking it will open the sharing options to set up access for others.
  • Invite the user: Enter the email address of the person you share the file with. You can customize their permissions, choosing Can Edit for full access or Can View for read-only. Add a personalized message if needed, then click Send.
  • Enable change tracking: Go to the Review tab and select Track Changes > Highlight Changes. Check “Track changes while editing” and choose whether to track changes for everyone or specific users.
  • Protect the workbook: Choose Encrypt with Password to add an extra layer of security or Protect Workbook Structure to prevent unauthorized edits. Set a strong password and share it only with trusted collaborators.
  • Save and share: Double-check that change tracking and protection are enabled, then save the file. Share it by sending the link or clicking Send. Your work is now safe and ready for collaboration.

How to Edit Excel Shared Workbook?

Editing a shared Excel workbook can be simple if you follow a few key steps. Here’s how to make the most of it:

  • Open the shared workbook: Locate the shared workbook and open it as you would any other file. Ensure everyone else has access if needed.
  • Check for permissions: Ensure you have the right permissions to edit. If you’re not authorized, you might only be able to view the file.
  • Edit in real-time: Make your changes directly in the shared workbook. If the file is stored in the cloud (e.g., OneDrive or SharePoint), edits update in real-time for all users.
  • Track changes: Use Excel’s “Track Changes” feature to monitor what’s been updated. This helps keep tabs on contributions and spotting errors.
  • Save and resolve conflicts: Save your changes regularly. Excel will notify you of a conflict if someone else edits the same cell. Please work with your team to resolve it and keep the data accurate.

How to Remove Users from Excel Shared Workbook?

Sometimes, you need to clean up access to a shared workbook. Maybe someone no longer needs it, or you want tighter control. Don’t worry—it’s easy! Here’s how to remove users step by step:

  • Open the shared workbook: Start by opening the workbook you want to update. Ensure you’re using an Excel version that supports managing shared access.
  • Click “Share”: Look for the “Share” button, usually in the top-right corner of your workbook. This is where you’ll manage who has access.
  • View shared users: A list of everyone sharing the workbook will appear. You can see who has editing or viewing rights.
  • Select “manage access”: Click “Manage Access” to adjust permissions. It is your control panel for deciding who stays and who goes.
  • Remove users: Find the person you want to remove, then click the option to revoke their access. It’s straightforward—just a couple of clicks.
  • Confirm changes: Double-check your updates and confirm the changes. This ensures the user’s access is successfully removed.
  • Save the workbook: Finally, save the workbook to lock in the updated permissions. You’re all set!

How to Unshare a Workbook in Excel?

Sharing is great—until it’s not. Whether the collaboration is over or you need to secure your data, unsharing a workbook is a smart move. Here’s how to do it step by step:

  • Open the workbook: Start by opening the workbook you want to unshare. Ensure you have full editing rights; otherwise, you won’t be able to make this change.
  • Click “share”: Look for the “Share” button, usually in the top-right corner of the workbook. It’s your gateway to managing access.
  • Select “manage access”: Find the “Manage Access” option once the sharing panel opens. This is where you control who can view or edit your workbook.
  • Stop sharing: In the access list, look for the option to stop sharing or remove all shared users. It might be as simple as clicking “Stop Sharing.”
  • Confirm the action: Excel will usually ask you to confirm that you want to stop sharing. Go ahead and click “Yes” or “Confirm”.
  • Save the workbook: Save the file to ensure your changes take effect. Now, the workbook is yours alone again.

What are the Tips for Using Sharing Excel Workbook?

Sharing an Excel workbook can boost collaboration, but a few innovative strategies make the process smoother. Here are four essential tips to get it right:

  • Set permissions and communicate: Control who can edit or view the file. Clear permissions prevent accidental changes. Make sure everyone knows their role—good communication avoids confusion.
  • Use cloud storage: Store the workbook in the cloud, like OneDrive or SharePoint. It ensures easy access, automatic saving, and real-time updates for all users.
  • Enable track changes and resolve conflicts: Turn on “Track Changes” to monitor edits. If conflicts arise (and they will), resolve them quickly to maintain accurate data.
  • Keep it lightweight: Avoid bloating the workbook with unnecessary data or complex formulas. A lean file loads faster and works better for everyone.

How to Visualize Data in a Shared Excel Workbook?

Sharing an Excel workbook is the backbone of team collaboration. It keeps everyone on the same page and ensures seamless updates.

But let’s face it—Excel’s data visualization tools can be underwhelming. That’s where ChartExpo steps in. It’s a powerful add-on that transforms your data into stunning, insightful charts, taking your data analysis to the next level.

Ready to share smarter and visualize better? Install ChartExpo.

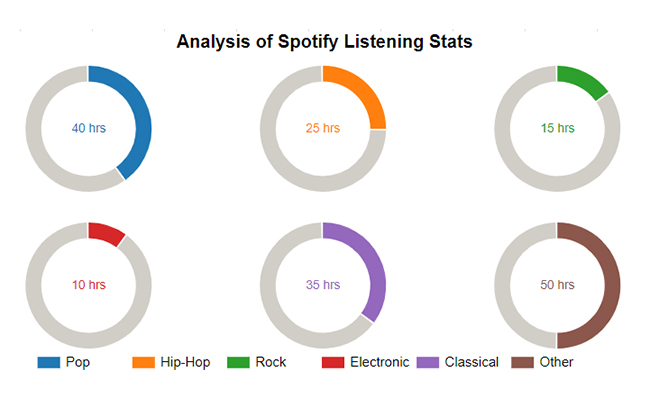
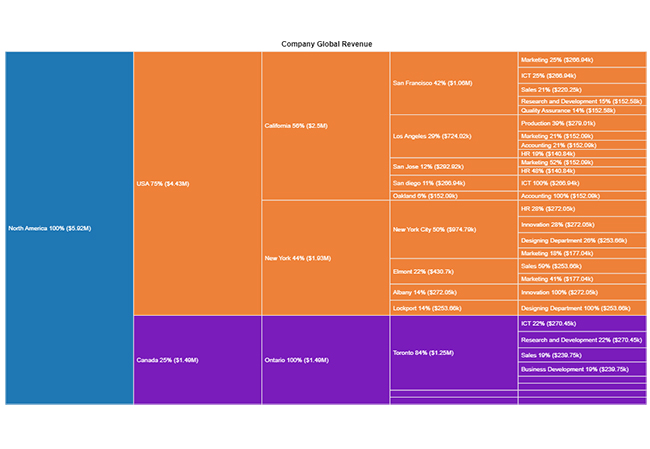
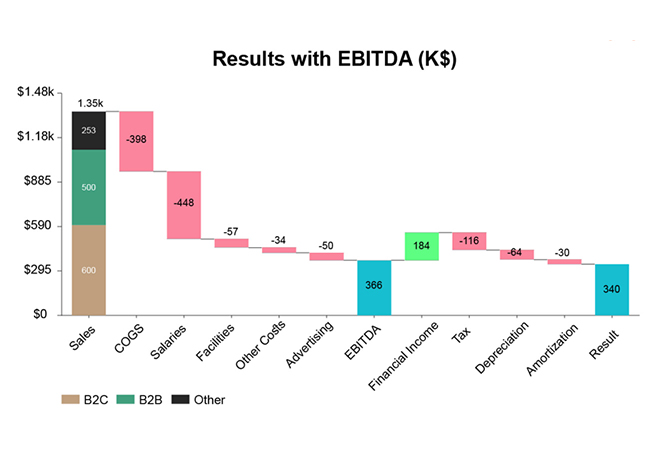
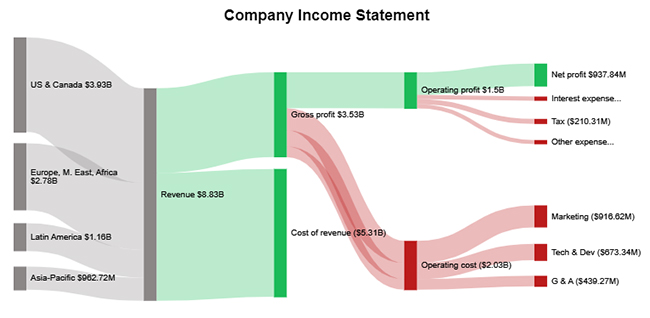
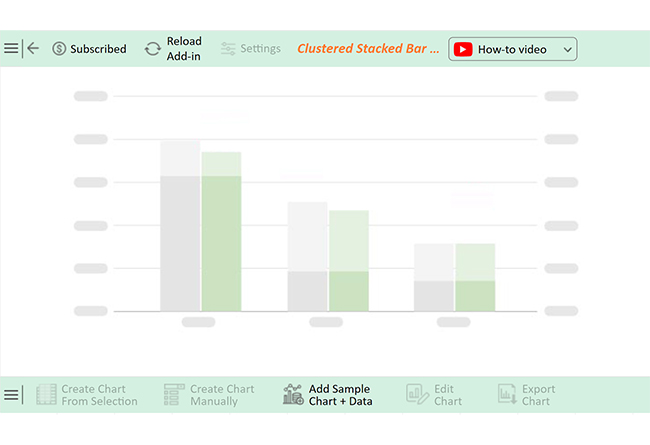
Here are the top 10 charts and graphs created in Excel using ChartExpo.

Comparison Bar Chart

Comparison Bar Chart After Learning How to Share Excel Workbook

Likert Scale Chart

Likert Scale Chart After Learning How to Share Excel Workbook

Horizontal Waterfall Chart

Horizontal Waterfall Chart After Learning How to Share Excel Workbook

Progress Circle Chart

Progress Circle Chart After Learning How to Share Excel Workbook

Multi Axis Spider Chart

Multi Axis Spider Chart After Learning How to Share Excel Workbook

Tree Diagram

Tree Diagram After Learning How to Share Excel Workbook

Waterfall Chart

Waterfall Chart After Learning How to Share Excel Workbook

Sankey Chart

Sankey Chart After Learning How to Share Excel Workbook

Gauge Chart

Gauge Chart After Learning How to Share Excel Workbook

Clustered Stacked Bar Chart

Clustered Stacked Bar Chart After Learning How to Share Excel Workbook

Let’s learn how to install ChartExpo in Excel.

  1. Open your Excel application.
  2. Open the worksheet and click the “Insert” menu.
  3. You’ll see the “My Apps” option.
  4. In the Office Add-ins window, click “Store” and search for ChartExpo on my Apps Store.
  5. Click the “Add” button to install ChartExpo in your Excel.

ChartExpo charts are available both in Google Sheets and Microsoft Excel. Please use the following CTAs to install the tool of your choice and create beautiful visualizations with a few clicks in your favorite tool.

Example

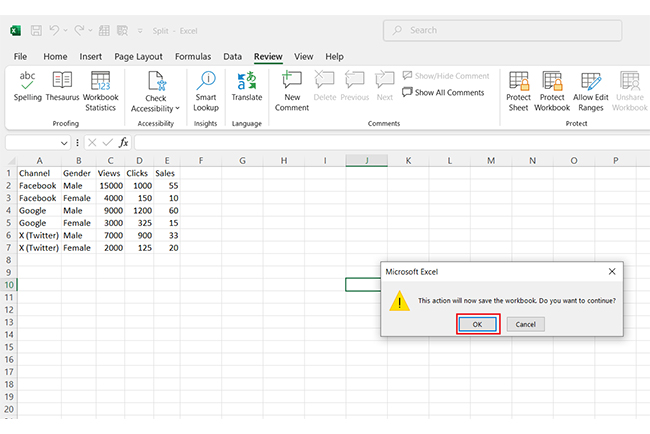
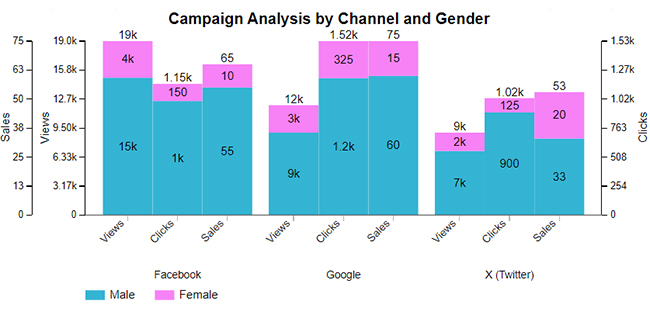
Let’s analyze this sample data in Excel using ChartExpo, a powerful tool for analyzing and interpreting data to uncover valuable insights.

Channel Gender Views Clicks Sales
Facebook Male 15000 1000 55
Facebook Female 4000 150 10
Google Male 9000 1200 60
Google Female 3000 325 15
X (Twitter) Male 7000 900 33
X (Twitter) Female 2000 125 20
  • To get started with ChartExpo, install ChartExpo in Excel.
  • Now Click on My Apps from the INSERT menu.
insert chartexpo in excel
  • Choose ChartExpo from My Apps, then click Insert.
open chartexpo in excel
  • Once it loads, scroll through the charts list to locate and choose the “Clustered Stacked Bar Chart”. This chart is best suited to this scenario.
search clustered stacked bar chart in excel
  • You will see a Clustered Stacked Bar Chart on the screen.
See Clustered Stacked Bar Chart After Learning How to Share Excel Workbook
  • Click the “Create Chart From Selection” button after selecting the data from the sheet, as shown.
Click Create Chart From Selection After Learning How to Share Excel Workbook
  • ChartExpo will generate the visualization below for you.
Initial Visual After Learning How to Share Excel Workbook
  • If you want to have the chart’s title, click Edit Chart, as shown in the above image.
  • Click the pencil icon next to the Chart Header to change the title.
  • It will open the properties dialog. Under the Text section, you can add a heading in Line 1 and enable Show.
  • Give the appropriate title of your chart and click the Apply button.
Add Chart Header After Learning How to Share Excel Workbook
  • You can change the color of the Male section by clicking on the Legend small pencil icon:
Change Color of Male Section on Legend After Learning How to Share Excel Workbook
  • You can change the color of the Female section by clicking on the Legend small pencil icon:
Change Color of Female Section After Learning How to Share Excel Workbook
  • Click the “Save Changes” button to persist the changes.
Click Save Changes After Learning How to Share Excel Workbook
  • Your Clustered Stacked Bar Chart will appear as below.
Final How to Share Excel Workbook

Insights

  • Male users outperform female users in generating views, clicks, and sales across all channels.
  • Google dominates in sales, especially among male users.
  • Facebook achieves the highest overall views but shows lower sales efficiency.

Steps to Make Clustered Stacked Bar Chart in Microsoft Excel:

  1. Open your Excel Application.
  2. Install ChartExpo Add-in for Excel from Microsoft AppSource to create interactive visualizations.
  3. Select the Clustered Stacked Bar Chart from the list of charts.
  4. Select your data
  5. Click on the “Create Chart from Selection” button.
  6. Customize your chart properties to add header, axis, legends, and other required information.

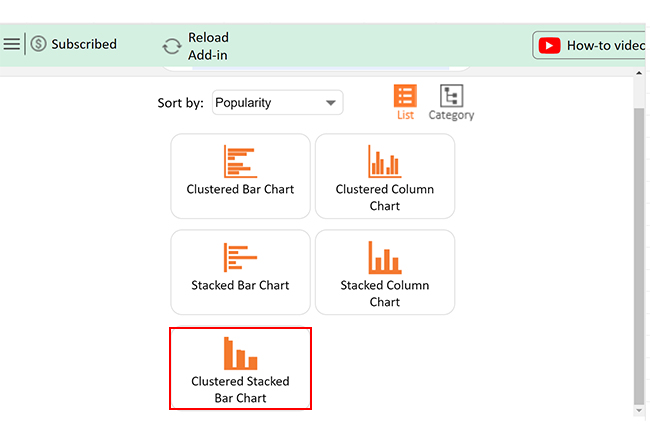
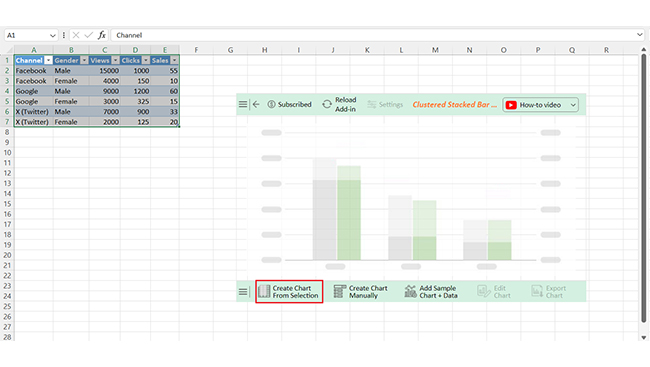
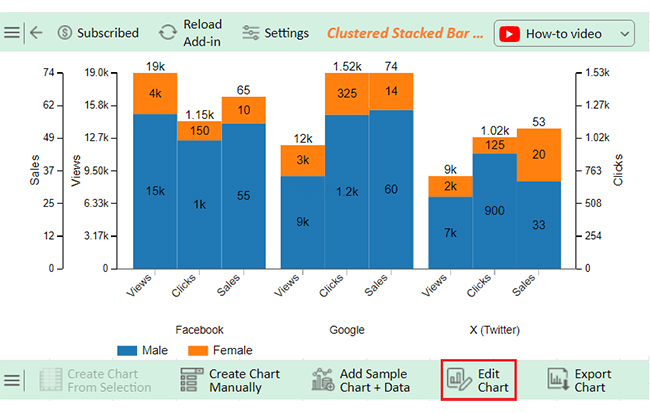
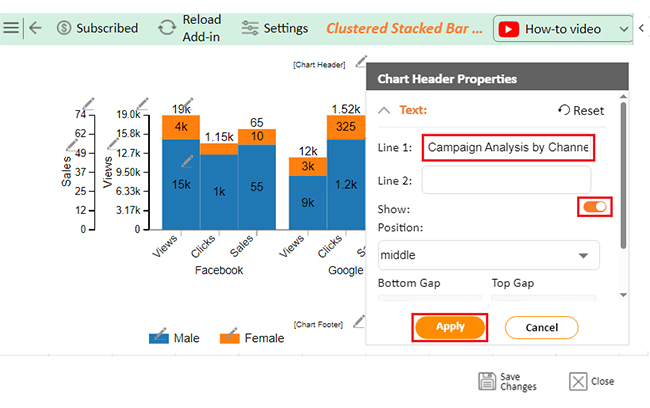
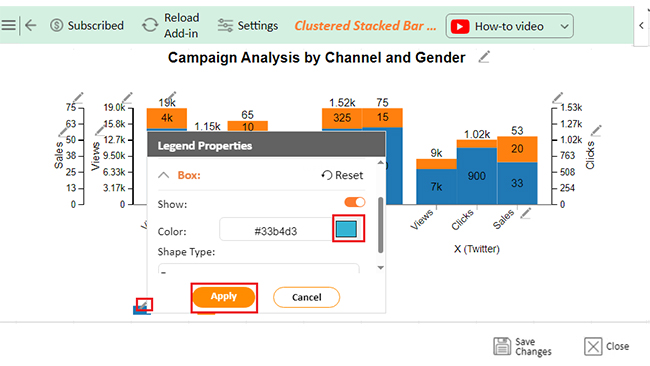
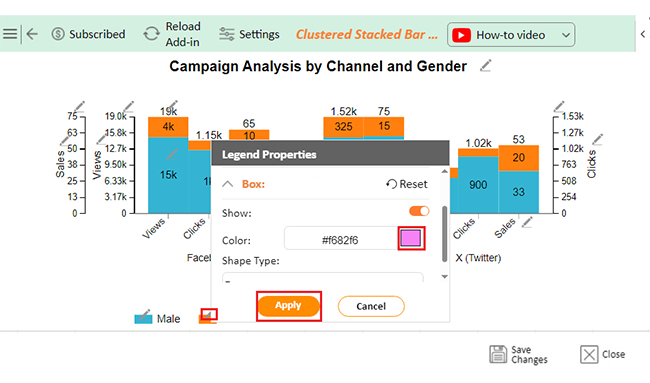
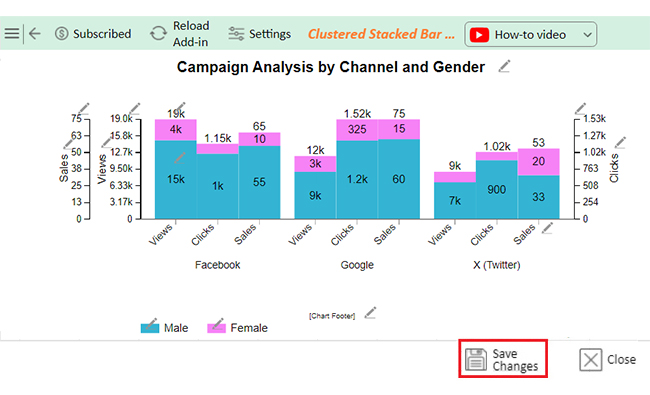
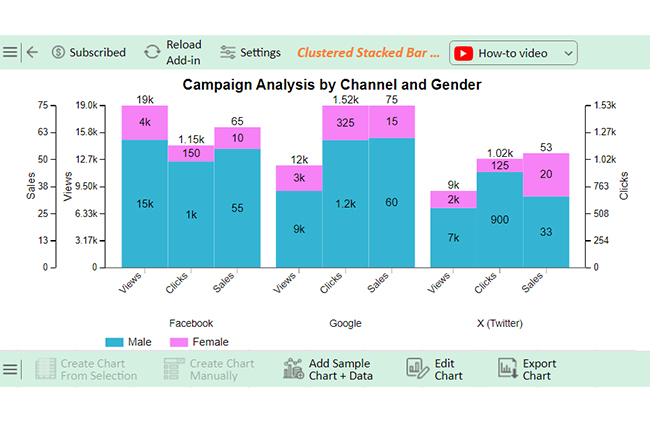
The following video will help you to create a Clustered Stacked Bar Chart in Microsoft Excel.

What are the Benefits of Sharing Excel Sheets?

Imagine this: You’re working on a project with your team. Instead of sending endless email attachments back and forth, you open a shared Excel sheet to collaborate seamlessly. Need to move columns in Excel for better organization? No problem. Sharing Excel sheets can transform how you work, making life easier for everyone. Here’s how:

  • Real-time collaboration: With shared Excel sheets, everyone can work together simultaneously. Changes happen instantly, so no one gets left behind.
  • Version control: Forget the nightmare of tracking file versions like “Final_Final_2.xlsx”. A shared sheet keeps everything updated in one place. No duplicates, no confusion.
  • Easy access: You can access your shared Excel sheet from anywhere—on your laptop, tablet, or phone. It’s all in the cloud, making remote work a breeze.
  • Transparency: Everyone sees the same data, so there’s no room for misunderstandings. It builds trust and keeps everyone on the same page.
  • Improved productivity: Collaboration becomes seamless, and decision-making accelerates with shared Excel sheets. This approach enhances workflows, boosts productivity, and supports data-driven decision-making for better outcomes.
  • Security: Are you worried about sensitive data? Modern sharing options let you control who sees or edits your file.
  • Enhanced communication: Shared Excel sheets eliminate communication gaps. You can add comments, tag team members, and share updates in one central space. It’s like having a digital conversation over data.

What are the Limitations of Excel Shared Workbooks?

Excel-shared workbooks can be handy tools, but they need fixing. Let’s take a closer look at the challenges you might face:

  • Limited features: Advanced tools like macros and certain formulas often don’t work in shared workbooks. This limits what you can do and might slow down your workflow.
  • Performance issues: Shared workbooks can lag as the file grows or more users edit it. The performance drop can be frustrating, especially during critical tasks.
  • Compatibility challenges: Different Excel versions or operating systems don’t always play nicely. Compatibility issues can cause errors or disrupt the user experience.
  • Conflict and security risks: Simultaneous edits lead to overwritten or lost data. Plus, your shared workbook could be at risk of unauthorized access without proper controls.
  • Offline and AutoSave limitations: Offline work means reduced functionality; in some versions, there’s no AutoSave.

FAQs

How do I share an Excel workbook and allow editing?

To share an Excel workbook for editing:

  • Save it to OneDrive or SharePoint.
  • Click “Share” in the top-right corner.
  • Enter the user’s email, set their permission to “Can Edit”, and click “Send”.

How do I enable the share workbook button in Excel?

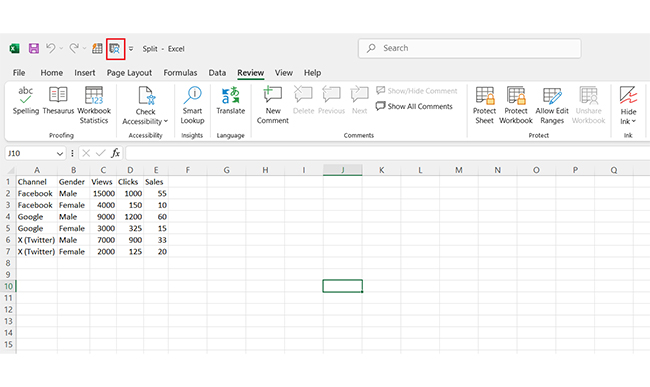
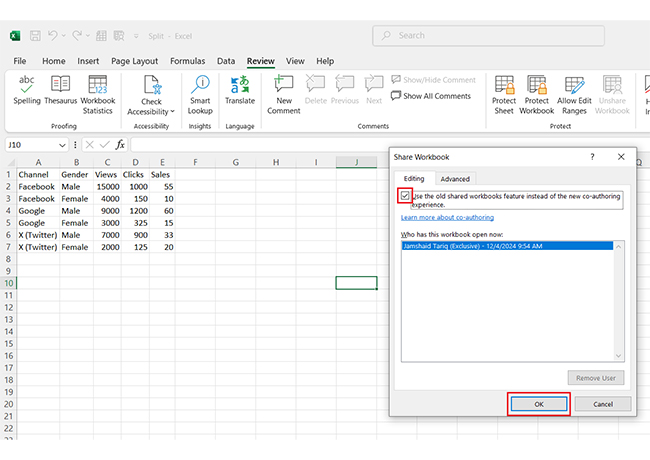
To enable the “Share Workbook” button:

  • Go to File > Options > Customize Ribbon.
  • Under “Choose commands”, add “Share Workbook (Legacy)” to the ribbon.
  • Click OK. Now, you can access the feature under the “Review” tab.

How do I share an Excel workbook with an external user?

To share an Excel workbook with an external user:

  1. Save it to OneDrive or SharePoint.
  2. Click “Share,” enter their email, and grant “Can Edit” or “Can View” permissions.
  3. Send the invite.
  4. They’ll access the file securely online.

Wrap Up

Sharing an Excel workbook is essential for effective collaboration. It streamlines teamwork, making it easier to share ideas and manage data. Whether working remotely or in person, this skill ensures efficiency and keeps everyone aligned.

Knowing how to share an Excel workbook can transform how teams work together. They can concentrate on their work instead of sorting through countless email threads. Real-time updates streamline collaboration and keep everyone aligned effortlessly.

Excel offers flexible sharing options to meet diverse needs. You can select specific individuals to edit or view the file. Permission controls provide added security, ensuring sensitive information stays protected.

Excel’s sharing tools are both powerful and easy to use. You can create shared workbooks for any project following a few simple steps. Practice these techniques regularly to improve collaboration skills.

Now, you know how to share an Excel workbook effectively. Applying these steps can transform your work processes, fostering better communication and teamwork. Whether managing a large project or handling daily tasks, sharing ensures success and simplicity. Excel makes collaboration more manageable, so take advantage of its tools today.

How much did you enjoy this article?

ExcelAd2
Start Free Trial!
145990

Related articles

next previous
Microsoft Excel12 min read

Key Performance Indicators in Healthcare for Better Insights

Key Performance Indicators in healthcare track patient care and efficiency. Learn about these KPIs, top examples, and how to use them to improve outcomes.

Microsoft Excel10 min read

BMI Calculation Formula in Excel for Better Fitness Insights

The BMI calculation formula in Excel helps track and analyze body mass index. Explore step-by-step instructions and tips to simplify BMI tracking in Excel.

Microsoft Excel29 min read

How to Create a Tornado Chart in Excel? A Complete Guide

Click to learn how to plot a Tornado Chart in Excel using easy-to-follow steps. Also, we’ll address the following question: what is a Tornado Diagram?

Microsoft Excel14 min read

How to Create a Scatter Plot in Excel with 3 Variables?

Click to discover how to create a Scatter Plot in Excel with 3 variables. We’ll also address the following question: why do we use Scatter Plot Graph?

Microsoft Excel12 min read

Construction Budget Spreadsheet for Better Planning

A construction budget spreadsheet helps track expenses and control costs. This blog explores benefits, top templates, and tips for better budgeting in Excel.

ChartExpo logo

Turn Data into Visual
Stories

CHARTEXPO

  • Home
  • Gallery
  • Videos
  • Services
  • Pricing
  • Contact us
  • FAQs
  • Privacy policy
  • Terms of Service
  • Sitemap

TOOLS

  • ChartExpo for Google Sheets
  • ChartExpo for Microsoft Excel
  • Power BI Custom Visuals by ChartExpo
  • Word Cloud

CATEGORIES

  • Bar Charts
  • Circle Graphs
  • Column Charts
  • Combo Charts
  • Comparison Charts
  • Line Graphs
  • PPC Charts
  • Sentiment Analysis Charts
  • Survey Charts

TOP CHARTS

  • Sankey Diagram
  • Likert Scale Chart
  • Comparison Bar Chart
  • Pareto Chart
  • Funnel Chart
  • Gauge Chart
  • Radar Chart
  • Radial Bar Chart
  • Sunburst Chart
  • see more
  • Scatter Plot Chart
  • CSAT Survey Bar Chart
  • CSAT Survey Chart
  • Dot Plot Chart
  • Double Bar Graph
  • Matrix Chart
  • Multi Axis Line Chart
  • Overlapping Bar Chart
  • Control Chart
  • Slope Chart
  • Clustered Bar Chart
  • Clustered Column Chart
  • Box and Whisker Plot
  • Tornado Chart
  • Waterfall Chart
  • Word Cloud
  • see less

RESOURCES

  • Blog
  • Resources
  • YouTube
SIGN UP FOR UPDATES

We wouldn't dream of spamming you or selling your info.

© 2025 ChartExpo, all rights reserved.